

SED, the short form of Stream Editor, is one of the most powerful text manipulation command-line tools that Linux offers. Predominantly used for text substitution, it can also perform other operations on files and text streams, such as finding patterns, replacing them without even opening files, inserting text, etc.
The command can also understand regex as a form of patterns rather than simple strings, which provide more flexible ways to filter or manipulate the text in files. The SED command follows a pretty simple syntax. Also, SED is pre-installed in almost all Linux distributions.
$ sed -i 's/pattern-or-regex/new-string/g' file
Let's try to understand the syntax of the SED command. The default behavior of the SED command is to display output to the standard output stream in Linux. However, if we want to perform in-place edits on files, we need to use the -i option. Also, if we use an extension called . bak and the -i option, a backup of the old file will be created before performing the edits.
The s command is used to specify that the operation to be performed is a substitution. Slash is used as a delimiter, and we specify the pattern as a simple string or a regex pattern. After that, we specify the replacement string. We have used another flag at the end called the global replacement (-g). The SED command with the g option helps to replace all the occurrences of the regex/string and not only the initial occurrence. However, the general syntax of this command is:
$ sed [options]... [script] [input-file]
Using SED to replace
We can use the s option and the SED command to replace the first occurrence of the string in a line, and this command can be performed for all the lines. Lines are separated by line breaks.
$ sed ‘s/technical/Technical’ ~/sample/file1.txt

We can observe that we have made the required replacements as per the above command.
Replacing all occurrences
By default, the SED command will be substituting only the first occurrence of each line's mentioned pattern. If there are multiple pattern matches in a single line, and we want to replace them, we can use the g (global replacement) flag.
$ sed 's/technical/Technical/g' ~/sample/file1.txt

Substituting nth occurrence
We can specify which position or occurrence of pattern in a line we want to replace by simply appending the value of n at the end of the replacement string.
$ sed' s/technical/Technical/2' ~/sample/file1.txt
In this example, we want to replace the second occurrence only.
 We can see that only the second appearance of the string/pattern has been substituted.
Replace on a specific line
We can also specify the line number on which we want to perform the replacement. Just add the line number in front of the replacement string as mentioned below.
$ sed '3 s/technical/Technical/' ~/sample/file1.txt
Here, we want to replace the word "technical" with "Technical" for the third line's first occurrence.
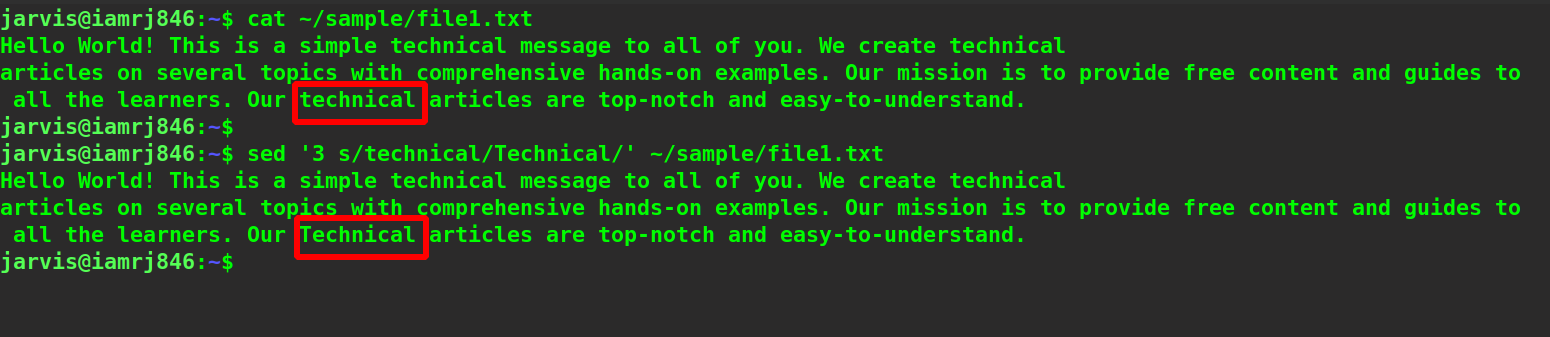 You can see that the desired operation has been performed.
Displaying partial content
Instead of printing or displaying the entire content of a file, we can print specific lines only. We need to use the -n option to prevent the command from printing the entire file and the p option to display particular lines. For example, if we want to print only the 2nd and 3rd line, we can use this command:
$ sed -n 2,3p ~/sample/file1.txt
 If we want to display all the lines except a few, we can mention the line numbers that we want not to print using the
d
option. For example, if we don't want to print the second line only, we can use the following method.
If we want to display all the lines except a few, we can mention the line numbers that we want not to print using the
d
option. For example, if we don't want to print the second line only, we can use the following method.
$ sed 2d ~/sample/file1.txt
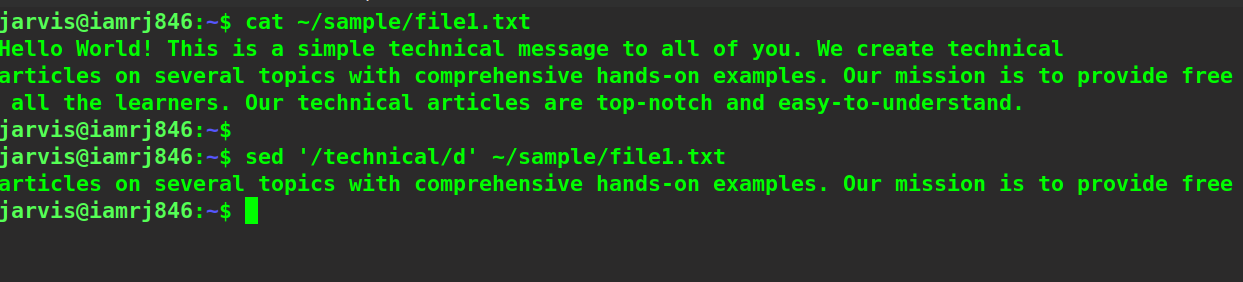
 We can see that the second line has not been displayed. Suppose we want to leave all those lines in which the command has found a match for the pattern and print all the rest lines; we can just append the
d
flag at the end of the replacement string.
We can see that the second line has not been displayed. Suppose we want to leave all those lines in which the command has found a match for the pattern and print all the rest lines; we can just append the
d
flag at the end of the replacement string.
$ sed ‘/technical/d’ ~/sample/file1.txt
If we want to print only those lines where the command has performed the replacement, we can append the s flag at the beginning for substitution, mention the pattern and replacement string so that it performs the replacement, and at the end, we can append the p flag which will print only the affected lines. We will also need to use the -n option to avoid printing the entire content.
$ sed -n 's/technical/Technical/p' ~/sample/file1.txt
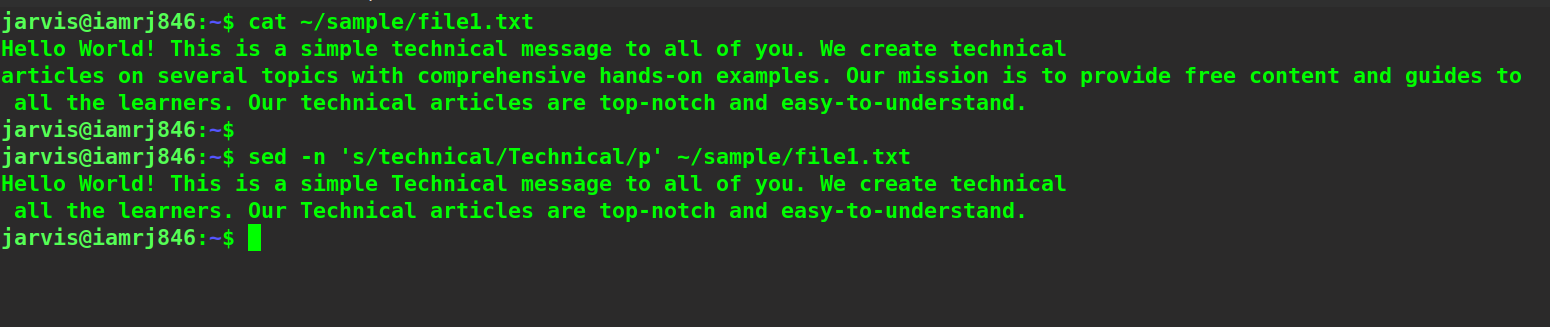 You can see that the command has printed only the affected lines.
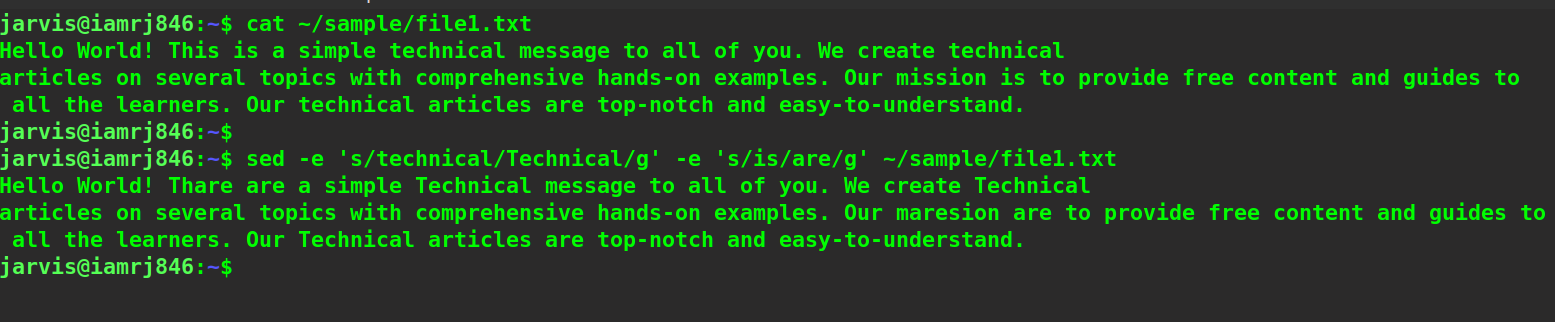
Combining multiple SEDs
If we want to perform more than one substitution using the SED command, we can perform it using the e option to chain all the commands. Suppose we want to replace "technical" with "Technical" and "is" with "are" at the same time; we can use this method.
$ sed -e ‘s/technical/Technical/g’ -e ‘s/is/are/g’ ~/sample/file1.txt
Wrapping Up!
To sum up, in this comprehensive and detailed article, we started by discussing the use of the SED command and what operations it can perform on text files and streams of text. Moving ahead, we discussed the general syntax of the SED command used to substitute patterns with strings of words. We then saw many options and flags that can be used with the SED command to modify the result.
For example, we discussed the s option for substitution, the g option for global replacement, the n option for displaying partial text, displaying the specific line, and replacing nth occurrences only. We performed partial replacements, and at the end of the tutorial, we discussed how we could use the -e option to combine multiple SED commands to make the process a whole lot easier.
We certainly hope that if you follow this guide on SED command, you will get hands-on experience with its real use-cases of it and adapt it for simple manipulations of text files.
Happy Learning!
People are also reading: