Docker is an open-source platform that has revolutionized the way applications are developed and hosted on the cloud or a server. In this article, we’ll start with a basic introduction to docker images, and the layering concept used in Docker images. We will understand how Docker runtime instances called containers are created from Docker images and several other terms such as base and parent images, manifest, and registries. Understanding this, will act as the building block, and moving ahead, we will then start with the different methods to build Docker images with hands-on examples.
Docker Image Layers
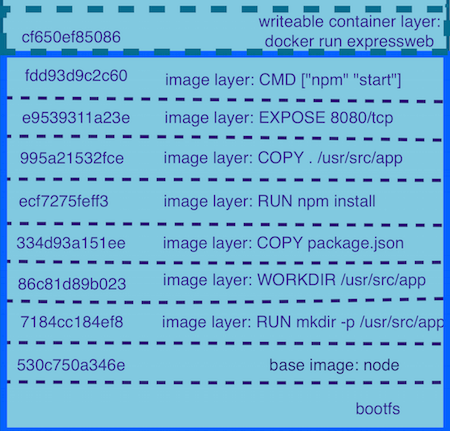
A Docker image is a multi-layered file used to run code in a Docker container. When a Docker user runs an image, one or more instances of containers associated with that image are generated. But how can an image be built with layers? Layers are generated (these are also called intermediate layers because they are the intermediate steps in creating a final image) when we run the docker build command to execute the commands in a dockerfile. We will discuss more about image layers when we actually build an image from a dockerfile. When you run the docker run command on an image, it transforms it into a container. A writeable layer is stacked on top of the image layers in the container. Since the image's lower layers are read-only, this writeable layer helps you to apply changes to the container. As you can see in the below image, the top layer was generated after we run the docker run command which executes all the sub-command mentioned in the Dockerfile of that image.
Base Image, Parent Image, and Docker Manifest
Parent image is the first layer while building an image. It is the foundation upon which other layers or other commands are structured. A parent image can be any official docker image such as an Operating system like ubuntu upon which you run your web server. One example is node:alpine. This is a lightweight parent image used by most web developers who build their web app in the form of a docker image because it contains all the preinstalled packages such as nodejs, npm, etc. which are necessary to run a node or react application. By using a parent image, you can prevent the hassles of doing the same thing repeatedly or installing the most common dependencies manually. In a Dockerfile , a base image has no parent image. It's made by using the FROM instruction at the top, in a Dockerfile. A Docker image contains an extra file known as a manifest in addition to a collection of files for individual layers. This is a JSON-formatted image definition that includes image identifiers, a digital signature, and instructions about how to customize the container for various host platforms.
Docker Images
There are a couple of ways you can create a docker image.
- Interactive method
- Dockerfile method
Interactive Method
In the interactive method, we have to spin up a container from a base image, and in that container, we install all the required libraries or dependencies. Then, we have to save that current state with all the packages installed, and can be used later. We are going to run an Ubuntu image and install nginx in that container and commit it.
$ docker run -it image_name:tag_name argument
Here, image_name is the name of the base image. The argument is the command we want the container to run when it starts.
$ docker run -it ubuntu bash

The -it options means interactive and bash is the command we want to run We are inside the container now where we can install all the required packages.
$ apt-get update && apt-get install -y nginx
Open another terminal window and run docker ps to list out all the active running containers on your machine.

We can use the docker commit command to save the existing state of the container. The name you see in the above image is generated randomly; you can specify your own name using --name tag while running a container.
$ docker commit [OPTIONS] CONTAINER [REPOSITORY[:TAG]]
Options are -
| --author or -a | Author |
| --change or -c | Save Dockerfile instructions to the created image. |
| --message or -m | commit message |
| --pause or -p | Pause container during commit |
In our example, the name of the Container is reverent _limiere
$ docker commit reverent _limiere ubuntu_nginx

Docker image command is used to list out all the images in the local machine registry. Now you can directly run the container associated with the ubuntu_nginx image having nginx preinstalled. You can type exit inside the container to kill or stop the container and get out of it.
Dockerfile method
A Dockerfile contains a series of commands that, when executed by the docker daemon, generate an image. We are going to perform the same example as we did in the interactive method that is creating an nginx server. Our Dockerfile is as follows.
FROM ubuntu:latest
EXPOSE 80
RUN apt-get update && \
    apt-get install nginx -y && \
    apt-get clean && rm -rf /var/lib/apt/lists/*
CMD ["nginx", "-g", "daemon off;"]
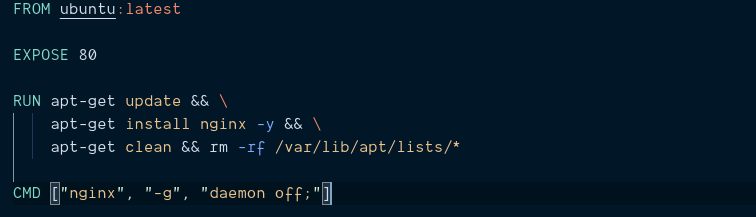
Let us go through all the steps one by one. As previously discussed, images are multi-layered files, and each line (also known as instructions) that you write in this file generates a layer for your image.
- A FROM instruction appears in any legitimate Dockerfile. This command creates the base image for your final image. When using ubuntu:latest as the base image, you get all of Ubuntu's features pre-installed in your custom image, enabling you to use commands like apt-get to install packages easily.
- The EXPOSE instruction is used to specify which port needs to be published. This doesn't mean you won't need to publish the port if you use this command. You'll also need to specifically use the publish option when using the docker run command. This EXPOSE instruction serves as documentation for someone attempting to run a container based on your image.
- A Dockerfile's RUN instruction runs a command within the container shell. The command apt-get update && apt-get install nginx -y updates the OS and installs NGINX. The commands apt-get clean && rm -rf /var/lib/apt/lists/* are some basic Ubuntu commands that are used to clean unnecessary files. The RUN commands are written in shell syntax. These can be written in exec format as well.
- Finally, the CMD instruction establishes the image's default command. This instruction is written in exec type and is divided into three sections. The NGINX executable is referred to as nginx here. NGINX has two options: -g and daemon off. This choice is used because running NGINX as a single process within containers is considered a best practice. The CMD command can also be written as a shell command.
- There are other instructions such as WORKDIR which specifies which directory should be the root for execution. COPY is used to copy files from your local machine to the container by specifying a path in the local machine and a path in the container.
Now, we have our Dockerfile. It's time to build a docker image. While running the build command, docker needs two things. One is the Dockerfile and the other is the build context. Context is the directory in which we have our dockerfile and other files which are accessed by the docker daemon. $ docker image <command> <options> $ docker image build .
- . - specifies the current directory or the context.
- If you name your Dockerfile as “Dockerfile”, the daemon looks for a file named “Dockerfile” by default.

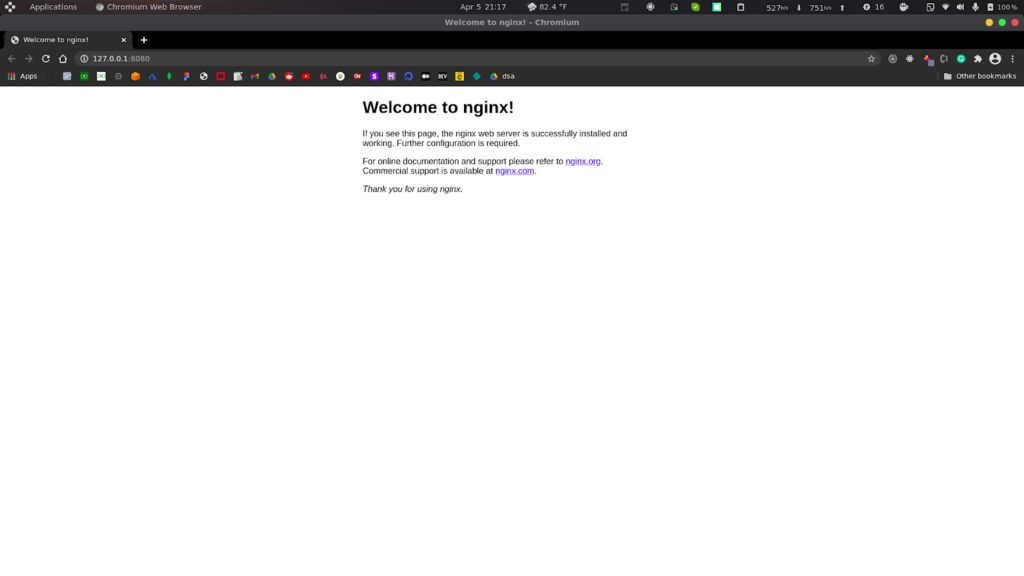
We have built our image successfully. Now let’s run it and check if it's working. You can omit the “container” in the below command.
$ docker container run --rm --detach --name ubuntu-nginx --publish 8080:80 3199372aa3fc
Here, --detach means that it will run in the background. The --publish option specifies which port to map from inside the container to our outside machine and expose the inner port. And the random ID mentioned there is the image ID.

Visit
http://127.0.0.1:8080
in your local machine to check whether the server is running.
You can list the images using “ docker images ls ” and can remove images using the command “ docker image rm <image-identifier> ”, the identifier can be a name or the image ID. “ docker image prune --force ” will remove or delete all the existing images in your machine.
Image layers
At the beginning of the article, we discussed that the image is multi-layered, so now we will discuss different layers of the above image that we created (nginx-server image).
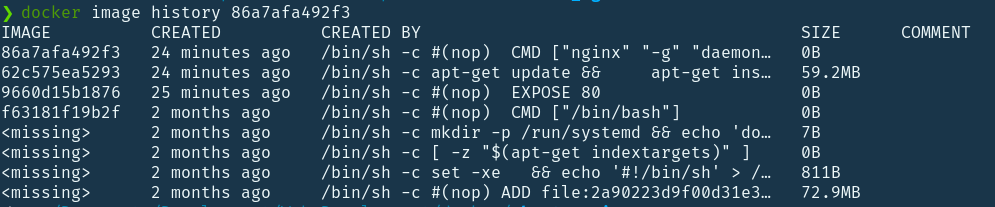
As you can see in the above picture that there are 8 layers, the last 4 are not to be concerned about. They are dangling layers. The first one is the latest one and responsible for running the container.
- The layer with ID f63181f19b2f was created by ubuntu base image, CMD [“/bin/bash”] specifies that it is the ubuntu shell.
- Our second instruction in the Dockerfile created a layer with ID 9660d15b1876. This was the EXPOSE instruction.
- /bin/sh -c apt-get update && apt-get instal nginx -y && apt-get clean && rm -rf /var/lib/apt/lists/* was the third instruction in our Dockerfile and this instruction created the layer with ID 62c575ea5393. Provided that all required packages were installed during the execution of this instruction, this image layer has a size of 60MB.
- The last instruction was CMD instruction which was the default or the primary command for the image and this created the final image with ID 86a7afa492f3.
Conclusion
In this article, we discussed Docker images, its layer mechanism, terms like parent and base images as well as Docker manifests. We hope that now you have a good understanding of not only how to create docker images but also how they are built internally using a layering mechanism. We discussed how we can create Docker images using two different methods - one is through interactive mode using the Docker run command and the other one is by specifying instructions inside Dockerfiles. We certainly hope that you will now be able to create your own customized images that would cater to the requirements of your applications. Happy Learning!