

Chrome is one of the widely used web browsers. The best thing about this browser is that it is highly extensible in terms of functionality. There are several extensions that can add different sorts of functionalities to the Chrome browser. But have you ever thought of creating your customized Chrome extension? Well, creating Chrome extensions and loading them into the Chrome browser for the first time can be challenging. However, if you know the procedure, you can accomplish this task quickly. In this article, we have explained how to create a basic extension for Chrome and load that into your Chrome browser.
What is a Chrome Extension?
Before we discuss the process of creating and loading an extension into the Chrome browser, you must develop a basic idea of what a Chrome extension is and how does it work? Well, in simple words, a Chrome extension is a combination of some HTML, CSS, and JavaScript with which you can simply add certain functionality to the Chrome browser. An extension is considered to be a simple web page that is hosted within Chrome and is capable of accessing some additional APIs .
What Extension are We Creating?
To guide you with the Chrome extension development process, we are creating a simple Chrome extension named “GTmetrix” that can check the speed of the websites.
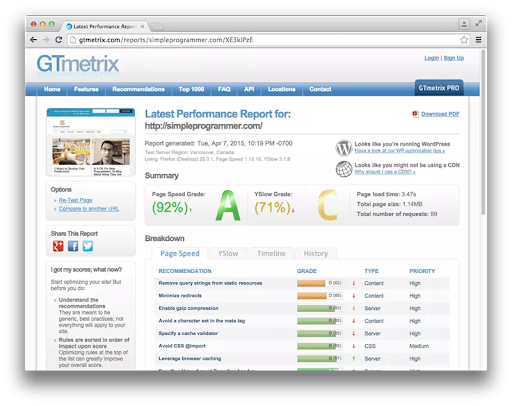
It would be a great idea to add it as an extension and to check the speed of your website by just clicking the button on Chrome’s toolbar. If you go through the Chrome web store, you will not find this type of extension, so we will create this extension.
Steps to Create the Chrome Extension
Here are the steps that you need to follow for creating the sample Chrome extension:
Step 1: Create the Project
We will start with creating the project and gathering all the required files for this extension. Firstly, we need to create a directory with the name “GTmetrix extension” and keep all the related files within this folder. We have to load the plugin by pointing it at the folder that contains all the extension files. For every extension, we require a manifest file that is required for loading the extension to Chrome properly. So, we will create a manifest.json file for our extension and store it in the folder that we have created for this project. You can leave the file blank as of now. Next, we need to create an icon for our extension that needs to be a 19X19 px PNG file. Next, we require an HTML page that will be displayed whenever a user clicks the Browser Action. For this, we will create a pop.html and pop.js files and store them in the project directory.
Step 2: Create the Manifest File
We will now add the code to the manifest file that we have created in step 1. Open the manifest file and add the following code to it:
{
  "manifest_version": 3,

  "name": "GTmetrix Plugin",
  "description": "for analyzing a page using GTmetrix",
  "version": "2.0",

  "browser_action": {
   "default_icon": "icon.png",
   "default_popup": "pop.html"
  },

  "permissions": [
   "activeTab"
   ]
}
The above code is simple and is self-explanatory. But the “browser action” is important to understand; it specifies the default icon of the extension and the HTML page that will be displayed when the user clicks the Browser action button. You can also see that we have added the permission section in the above code that allows you to access the activeTab. You should have the right access to open the URL of the GTmetrix.
Step 3: Create UI
Now, we will create the UI that will be displayed when the user clicks the Browser Action button.
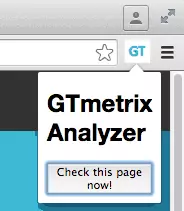
We will create a simple UI as shown in the above screenshot. To create the UI for the extension, open the pop.html file and add the following code:
<!doctype html>
<html>
  <head>
    <title>GTmetrix Analyzer</title>
    <script src="pop.js"></script>
  </head>

  <body>
    <h1>GTmetrix tool</h1>
    <button id="ch_page">Check this page now!</button>
  </body>

</html>
You can see that we have added the pop.js script here that will hold the actual logic for our extension. This logic will get executed when the button with the ch_page id is clicked.
Step 4: Implement the Logic Using pop.js Script
Now the last step is to implement the logic that will get executed when the user clicks the “check this page now” button inside of the tab. We will now add the event listener to listen for the click event on the ch_page button. Also, we need to create a new form that will submit the URL of the current page to the GTmetrix. Now, open the pop.js file and add the following code:
document.addEventListener('DOMContentLoaded', function() {
  var ch_pageButton = document.getElementById('ch_page');
  ch_pageButton.addEventListener('click', function() {

    chrome.tabs.getSelected(null, function(tab) {
      d = document;

      var f = d.createElement('form');
      f.action = 'http://gtmetrix.com/analyze.html?bm';
      f.method = 'post';
      var i = d.createElement('input');
      i.type = 'hidden';
      i.name = 'url';
      i.value = tab.url;
      f.appendChild(i);
      d.body.appendChild(f);
      f.submit();
    });

  }, false);
}, false);
Most of the above code is from the bookmarklet available on the GTmetrix website. We just tweaked the code to take in the URL from the currently active tab. In the above code, we are first registering a handler for the click event on the ch_page button. Whenever the user will click the button, it will display the currently selected tab and run some JavaScript code to create a form containing some hidden fields that are submitted to GTmetrix.
Step 5: Test the Extension
After you are done, you can easily test the extension in the Chrome browser. For this, you need to navigate to the “chrome://extensions” to open the extension page.
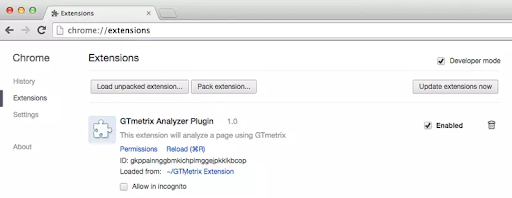 You can access the “Developer Mode” to enable loading unpacked extensions. You can now load your extension from the project folder. Click on the “Load unpacked extension” or simply drag the “GTmetrix Extension” folder onto the page for loading the extension. The extension will immediately show up as a Browser Action in the toolbar of the current tab. To test the extension, go to a page you want to test with GTmetrix. Click the GTmetrix extension icon, and after the popup window appears, click on the “Check this page now!” button. You will see the page speed metrics for the current webpage.
Conclusion
If you want to add some functionality to your Chrome browser, you can create a customized extension that can be loaded to Chrome. In general, Chrome extensions allow you to add new features to your Chrome browser for performing complex tasks with ease. In this article, we have only mentioned a basic example to explain how you can make a chrome extension. While creating the extension, make sure that you create the manifest.json file carefully to ensure the proper functioning of the extension.
People are also reading:


Leave a Comment on this Post