In the last JavaScript tutorial, we learned about
JavaScript if...else statements
. Where we used
if
statement when we want to execute a block of code based on a single condition,
if....else
statement to execute either of one statement between two blocks of code based on a single condition, and
if....else if.....
statement when we have multiple conditions and want to execute one block of code. In this JavaScript tutorial, we will learn about the JavaScript Switch Case statement, which is an alternative and elegant way to
if... else if...
statement. If you have ever worked with other programming languages like C++ and Java there, you have seen the
Switch Case
statement, and in JavaScript, it has a similar structure and use.
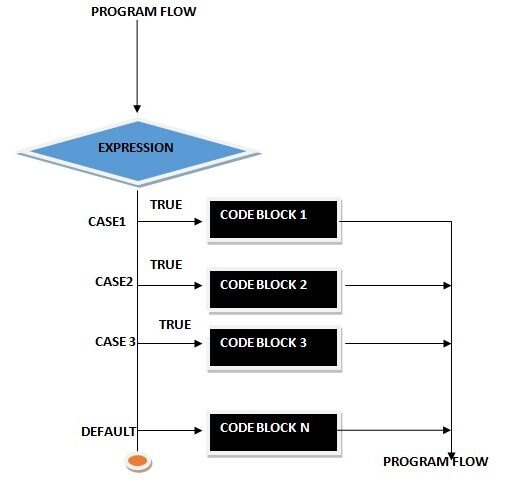
JavaScript Switch Case Flow Chart
Similar to the
if...else
statement, the Switch Case follows a flow pattern and executes a block of code based on the true condition.
JavaScript Switch Case Syntax
The overall Switch Case Statement built using 4 main keywords,
switch
,
case
,
break
,
and
default.
switch (expression)
    {
        case condition1: //case 1 code block;
        break;

        case condition2:  //case 2 code block;
        break;

        case condition3: //case 3 code block;
        break;

        default: // default code block
        break;
   }
The
switch
statement contains an expression that can either be a variable or value. The
case
contain a condition which must be a value. The JavaScript parses the
switch
expression
and check it with every
case
condition
value. If the case condition value matches the switch expression value, the code of the case gets executed. Every
case
statement must have a
break
keyword at last, else if the switch condition matches the first case, all the other cases also get executed. The
break
statement throws us out of the switch case statement when the interpreter executes any case. If all the cases do not satisfy the switch expression, the
default
code block gets executed, it is similar to the else statement of if....else statement. Now let's see the real use case of Switch Case with a classic switch case weekday example.
<!DOCTYPE html>
<html>
    <head>
        <title></title>
        <script>
            document.write("<h3> JavaScript Switch Case Example (With break)</h3>");
            let weekday =3;
            switch(weekday)
            {
                case 1:
                    document.write("Sunday");
                    break;

                case 2:
                    document.write("Monday");
                    break;

                case 3:
                    document.write("Tuesday");
                    break;

                case 4:
                    document.write("Wednesday");
                    break;

                case 5:
                    document.write("Thursday");
                    break;

                case 6:
                    document.write("Friday");
                    break;

                case 7:
                    document.write("Saturday");
                    break;

                default:
                    document.write("WeekDay value must between 1 to 7")
            }
        </script>
    <body>
    </body>
</html>
Output

From the output, you can see that our
switch
expression
weekday
value was
3
and based on the
weekday
value the corresponding
case 3
get executed with Tuesday printing on the web-page as the output.
Now let's execute the same above program without using the break statement in the case block.
<!DOCTYPE html>
<html>
    <head>
        <title></title>
        <script>
            document.write("<h3> JavaScript Switch Case Example (Without break)</h3>");

            let weekday =3;

            switch(weekday)
            {

                case 1:
                    document.write("Sunday <br>");

                case 2:
                    document.write("Monday <br>");

                case 3:
                    document.write("Tuesday <br>");

                case 4:
                    document.write("Wednesday <br>");

                case 5:
                    document.write("Thursday <br>");

                case 6:
                    document.write("Friday <br>");

                case 7:
                    document.write("Saturday <br>");

                default:
                    document.write("WeekDay value must between 1 to 7")
            }
        </script>
    <body>
    </body>
</html>
Output

From the output, you can see that not only
case 3
but all the other cases under 3 also get executed. This is because here, we are not using the
break
statement in the case statement blocks.
Summary
-
The switch case statement is an alternative for
if...else if..statement. - The switch defines an expression value, and the interpreter compares the expression value with case conditions.
- Every case block must have a break; statement at the end.
- If no case satisfies the switch condition, the default code block gets executed.
People are also reading: