

Linux offers a highly creative and flexible environment when it comes to accomplishing various tasks through commands. For running commands in the Linux terminal, you should have a good understanding of Linux's command-line interface and basic Linux commands . In this article, we will focus exclusively on the Linux PING command and its usage with several options. So, without further ado, let’s get started.
What is PING Command in Linux?
You can use the ping command in Linux for diagnosing the errors related to network connections. It is a basic Linux command that helps you to get working with the network. Ping command provides a way for checking the network node if it has lost its connectivity. Apart from this, the ping command will help you to carry out the following tasks:
- Measure the time taken by two nodes on the network to communicate.
- Identify the IP address of a particular host.
- Use a bash script to perform an automatic check with network nodes.
- To check if there is a connection available with a specific device or system.
If you are a network admin, it’s important to learn and understand the ping command. So, let's dive deep into this command.
How Does Ping Command Work?
The ping command sends a series of small packets to a network node for making a connection. This node can be tested using either the website’s IP address or the hostname. Once you get the IP address, you can send the packet to that node. This command in turn will verify and measure the time taken in receiving the response from the connected node. The response you get from the destination node may be affected due to many reasons, like geographical location and the type of hardware used between the two nodes. This command may work better with wired private networks than with bridged networks. The information generated with the help of the ping command will help to identify whether the network is good or bad. The syntax of the ping command is as follows: ping [options] [destination] The options part in the above command comes with the following options:
- -c: This option helps to specify how many packets you can send over the network.
- -s: This option will help you to change the default packet size.
- -v: This option will help to display the information in verbose mode.
- -w: It helps to specify a time period (in seconds) and the execution of the command without depending upon the number of packets sent or received.
- -i: This option will help to specify the interface that you can use for the network.
The destination specifies the destination node using an IP address or a hostname.
Prerequisites for Running the Ping Command in Linux
For running the ping command, you need to meet some requirements that are as follows:
- A Linux system where you will run the ping command.
- Access to the terminal.
- Appropriate user permissions for running the ping command.
How to Use the Ping Command?
The syntax of the ping command is followed by a hostname, website name, and the correct IP address. Below is the appropriate ping command syntax:
ping [option] hostname or IP address
If you want to check if a remote host is up, you can use the website name with the ping command. You can press Ctrl+c to stop the process.
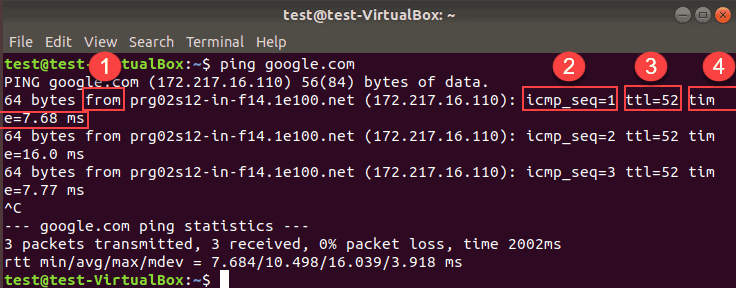
In the above image, the marked variables define the following:
- From indicates the destination along with its IP address. The address might be different for a website due to the geographical location.
- icmp_seq=1 represents the ICMP packet’s sequence number which will be increased by one for every request.
- ttl=52 represents the network hops number that a packet can take before being discarded by a router.
- Time-7.68 ms represents the time taken by the packet to reach the destination and back to its source.
Variations of Ping Command in Linux with Examples
Below are different variations of the ping command that you can use:
-
Checking local network
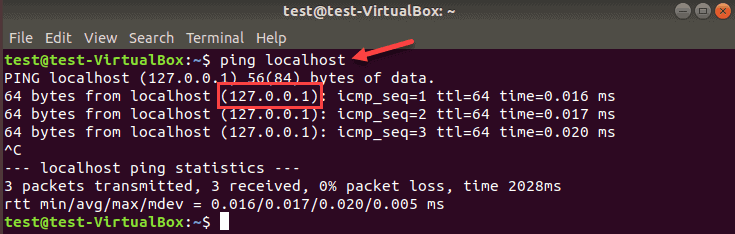
In case of any issue regarding a connection to a website or remote machine, you can use the ping command on the localhost for checking the connection to the network. You can use any of the below three ways for checking the local network interface:
- Ping 0 - This is the safest and fastest way for pinging the localhost. After running this command, the IP address will be resolved by the terminal providing a response.
- Ping localhost - You can use this alternative ping command by providing the localhost where the name refers to the computer.
- Ping 127.0.0.1 - You can even use the IP address of the localhost with the ping command.
Running either of the above methods, you will get an output similar to the one shown below:
-
Specifying the internet protocol
IPv6 is an advanced version of IPv4. The reason we moved to IPv6 is that IPv4 addresses are limited and creating new addresses is not an option anymore. You can use the below syntax for requesting the IPv6 or IPv4 addresses:
ping -6 hostname/IPv6
ping -4 hostname/IPv4
-
Changing the time interval
By default, the time interval that is set between each ping request is one second. The ping command will allow you to increase or decrease that time with the “-i” option. For decreasing the ping interval you can use the values less than one as shown in the example below:
ping –i 0.5 google.com
For increasing the ping time interval, you can use a value greater than one.
-
Changing the ping packet size
For increasing the size of the ping packet, you can use the ping command with the “-s” option that will help in increasing the packet size from its default value of 56 (84) bytes. Here, number 84 in the bracket specifies the number of ping bytes you can send including 28 bytes of the header packet. Considering the below example, you will be able to increase the size of the mentioned packet up to 1000 bytes.
ping –s 1000 google.com
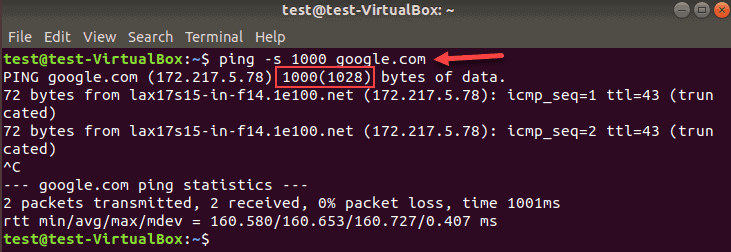
You can successfully test the network performance by using this command. This will tell you if there is any network throttle after increasing the packet size.
-
Flooding the network
If you want to test your network performance in the presence of a heavy load, you can use the ping flood command. You can use the “-f” option that will require root access for executing this ping command in Linux. Otherwise, you can use the sudo access to ping command for flooding the host. This command will send numerous packets.
sudo ping -f hostname-IP

The dots in the above output specify the number of sent packages while a backspace specifies the received response. The statistics line will specify the summary of the ping command.
-
Limiting the number of pings
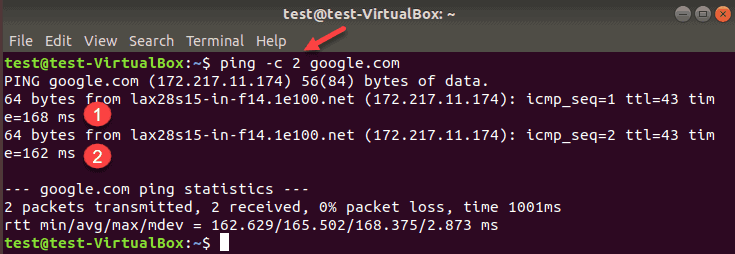
By default, you can send as many ping requests until you interrupt it. You will be able to limit the number of pings with the help of two methods that are as follows:
- If you want to stop the ping command automatically after sending a certain amount of packets, you can use the “-c” option and specify a number. This command will let you set the specific amount of ping requests.
ping –c 2 google.com
- For receiving a ping output after a specific time period, you can use the “-w” with the interval in seconds.
ping –w 25 google.com
More Variations of Ping Command in Linux with Examples
-
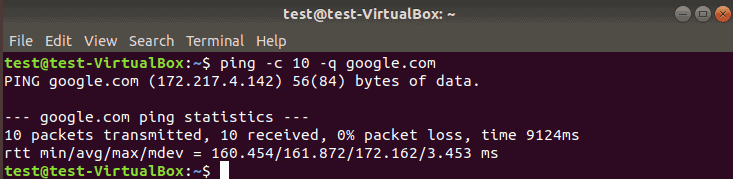
Suppressing the ping output
If you want to display only the summary and avoid clogging your screen with unnecessary information, you can use the “-q” option. It will display one line with regular ping information and then display the statistics at the end.
ping –c 10 -q google.com
Generally, we use the “q” option with other options as shown in the screenshot below:
-
Adding timestamp before every line
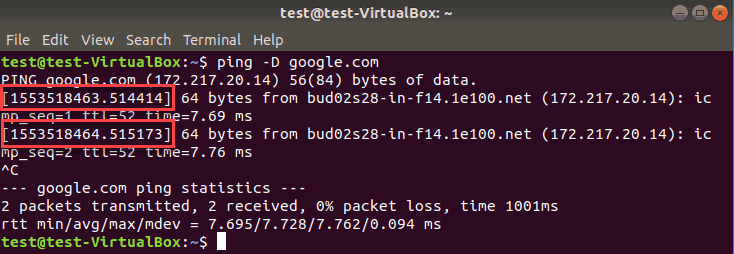
If you want to know the time for every packet while executing the ping command, you can use the “-D” option. The timestamp will be in the UNIX format.
ping –D google.com
-
Showing ping version
You can use the “-V” option with the ping command for displaying the utility version.
ping –V google.com

Conclusion
After reading this article, you might have understood the use and importance of the ping command in Linux. This command comes with various options that enhance its utility. Also, there are many options other than the ones discussed above that you may use for getting more details of your network connection.
People are also reading:
- Shell Commands in Linux
- How to use LN Command to create Symbolic Links in Linux?
- How to use CHOWN command in Linux?
- How to use GREP Command in Linux?
- rmdir Command in Linux
- ls Command in Linux
- pwd Command in Linux
- Linux Interview Questions
- How to use mkdir command in Linux?
- How to Use cd Command in Linux?
- How to use CHMOD command in Linux?


Leave a Comment on this Post