Docker achieves isolation of containers by using some of the Linux kernel features called cgroups and namespaces and applies them to containers. But what if we have multiple containers and we want them to communicate with each other. For instance, suppose we have a frontend app and a backend app along with a message queue which must be in sync with both the applications. This is where the concept of docker networking comes in.
Docker Networking
One of the reasons why Docker containers and services are so robust is that we can link or connect them together to form a network and share the workloads. Docker containers and services do not really need to know whether they have been deployed on cloud or bare metal servers. It’s platform-independent and a single Docker network can contain nodes from the cloud, virtual machines, or servers running different operating systems . Docker networking can be defined as a channel for communication, through which isolated containers communicate, to perform certain actions and share information and data.
Goals
Some of the main goals to perform networking in Docker are -
- The primary goal of docker is that it offers flexibility by allowing a variety of apps to connect with each other on different platforms.
- Docker operates on a decentralized network that allows scalability and high availability (even during downtimes) of the software. If a container or host is unexpectedly absent from your resource pool, you can either allocate those tasks to a supplementary resource or move to already active services.
- It is also user-friendly, due to the abstraction it provides while building and developing applications.
- Docker can run on Linux, Windows, and Mac. The same application can run on all three of these without any additional configurations, hence making it cross-platform.
Pillars
Let’s discuss the most significant things of docker networking, the three pillars are the Container Networking Model (CNM), libnet or libnetwork, and the drivers. We’ll talk about each of them in great detail. The Container Network model is like a DNA for libnetwork and drivers, because they are built on the objectives of CNM. Libnetwork is an open-source library, The CNM model incorporates the steps necessary to network containers, thus offering an abstraction to accommodate many network drivers. The CNM model formalizes networking with containers to implement libnetwork. The APIs are used for creating/deleting address pools and for assignment/deallocation of IP containers, while network plugin APIs are used for network creation/deletion and for add/removal of network containers. CNM serves as an interface for these plugins since the network configuration needs a key-value pair. Let us list down the objects of the container network model.
- Network Controller : The Network Controller provides the Libnetwork entry point that sets out basic Docker Engine APIs for network allocation and management. Since Libnetwork supports built-in and remote drivers, Network Controller allows users to connect a specific driver to a particular network.
- Driver : This is the network owner and is responsible for network management by participating in multiple processes to meet different requirements and implementation scenarios.
- Sandbox : A Sandbox includes the container network stack configuration. This includes the container interface control, routing table, and DNS configuration. A Linux Network namespace, a FreeBSD jail, or other related terms may be used for a sandbox. A sandbox can have multiple network endpoints.
- Endpoint : It provides links to other networks offered by other network containers with services exposed to a container. An endpoint is a service and not necessarily a specific container; it has therefore a global reach within a cluster.
- Network : It helps us to connect or isolate from the rest of the endpoints that belong to the same network. Therefore, the relevant driver will be informed of the event if a network is created or modified.
The third important pillar is Network driver. There are mainly 5 types of drivers:
- Bridge : As for networking, a network bridge is a Link Layer interface that transfers traffic between network segments. A bridge is a hardware or a software interface that operates inside the kernel of a host computer. In terms of Docker, a bridge network uses a software bridge that enables the connection of containers connecting with the same bridge network and isolates containers not linked to the bridge network. The Docker bridge driver installs rules in the host automatically so that containers do not connect directly on the bridge networks. Containers operating on the same Docker daemon host can access a Bridge network. You can either handle the routing at the operating level or use an overlay Network to communicate between containers running on various Docker daemon hosts. When we start Docker, it immediately builds a default bridge network (also known as the bridge) and newly-started containers connect to this network unless stated otherwise. Custom bridge networks established by users can also be developed. The bridge networks specified by users are superior to the standard bridge network.
- Host: The container network stack is not separated from the Docker server when we use the host network mode for a container, and the container does not get an IP address of its own.Control traffic (traffic-related to swarm and server management) is still transmitted via an overlay network, but the actual swarm service containers transmit information through the host network of the Docker daemon and ports. This poses some other constraints. The host mode networking can help in optimizing performance, as it does not require network address translation (NAT) and no 'userland-proxy' for each port, in situations where a container must handle a wide variety of ports. The host network driver runs only on Linux hosts and is not allowed on Mac or Windows.
- None: Containers in this type of network have no connection to the outside network or any other containers. This network, therefore, is used when the networking stack on a container is fully disabled and only a loopback interface is created.
- Overlay : The network overlay driver provides a distributed network among multiple daemon hosts in Docker. This network sits above (overlays) the host networks, which allows containers that are attached to it (including swarm server containers) to communicate securely. Docker manages the route to and from the appropriate Docker daemon host and destination container transparently. Using the docker network, we can build user-specific overlay networks the same way we can create user-defined bridge networks. Containers or services can be linked at a time to more than one network. While both swarm services and stand-alone containers can be connected to an overlaying network, default behavior and setup issues are distinct.
- Macvlan : Certain applications, especially legacy applications or network traffic control applications, expect to be linked to the physical network directly. In such a case, a MAC address can be applied to the virtual network interface of each container with the macvlan network driver, which will tend to be directly attached to the physical network. In this case, a physical interface on the macvlan machine of your Docker Host and the macvlan's subnet and gateway must be defined.
Understanding Docker Networking Commands
The docker network is the primary command for container network configuration and management.
$ sudo docker network
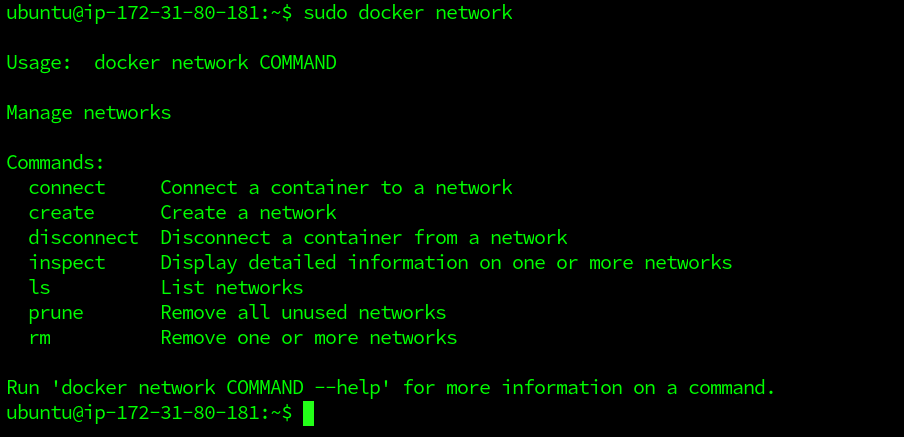
The command output above illustrates how we can use the command along with all subcommands of the docker network. As we can see from the output, we can build new networks, list existing services, inspect networks and delete networks with the docker network command. It also enables us to attach containers from networks and disconnect them. To view the list of existing networks in the host, we can execute the below command.
$ sudo docker network ls
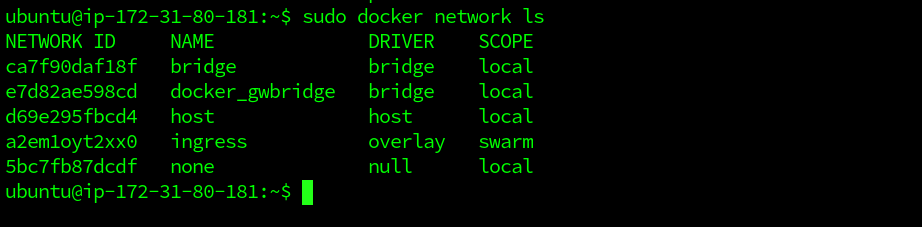
In the output of the docker network ls command, the new networks that we build will also appear along with the default ones. Each network is provided with a unique ID and NAME. A single driver is often connected to every network. You will also see a swarm overlay network, which we will explain later on. The "bridge" and the "host" networks have the same name as their respective drivers. To view network configuration information, the docker network inspect command can be used. It displays specifics such as name, ID, driver, IPAM driver, info subnet, containers attached, etc. Let us inspect the bridge network using the docker network inspect command followed by network name:
$ sudo docker network inspect bridge
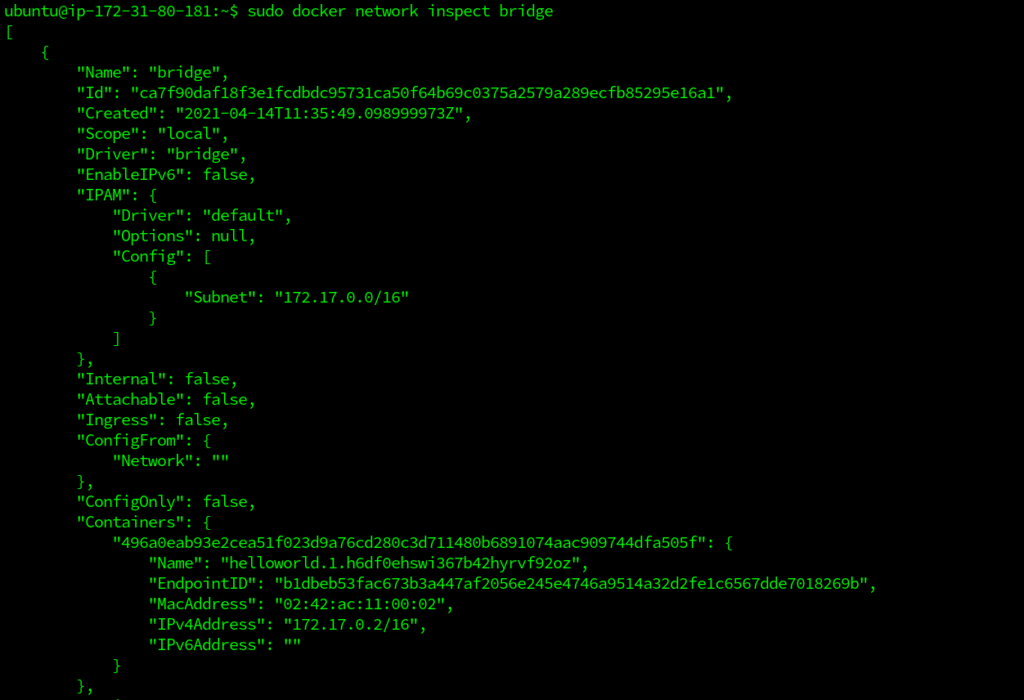
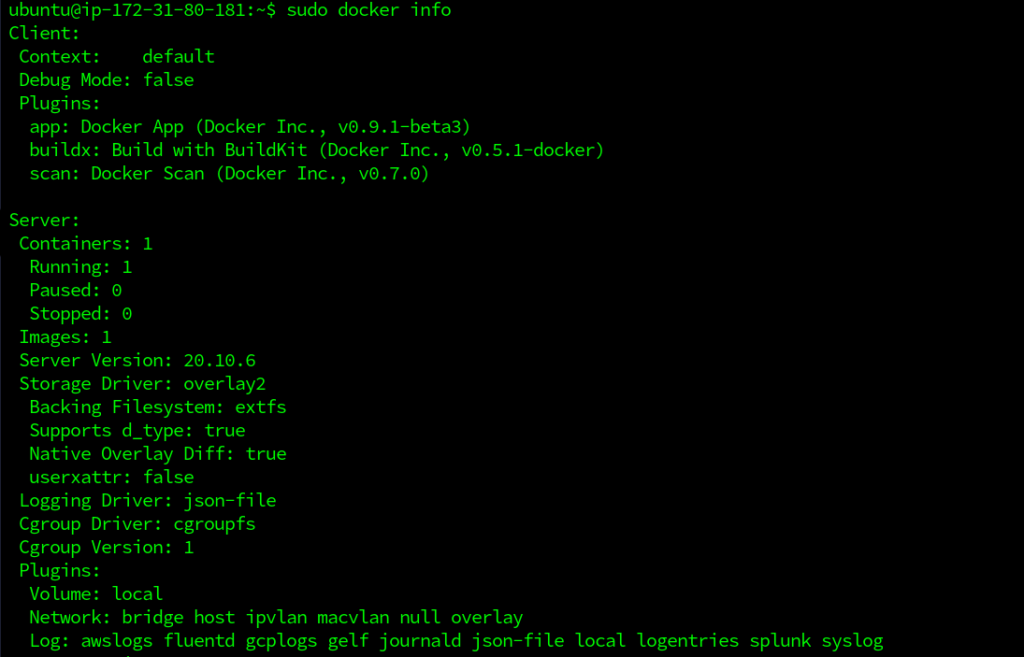
This gives the output in a JSON format. We can also use the network ID instead of the network name, for inspect command. The docker info commands lists out all the available details about docker networking as well.
$ docker info
Now, let us use docker networking knowledge to create docker swarm mode for communication between nodes through a network. For this example, we will need two Linux machines or their instances on cloud. Here, we will be using AWS EC2 instances , one for the manager node and one for the worker node. We will create a multi-container application that will contain a web app running on one container and an MYSQL database on another, and these containers will be running on two different Linux machines or nodes or containers. And we need to connect them through a network in a swarm cluster. Also, we need to have docker installed on both these machines. Now that we have the idea, let’s get started.
- Let’s SSH into one of these machines, which will act as our manager (which is responsible for task allocation and cluster configuration). In the terminal, type the below command to initialize the swarm cluster.
$ sudo docker swarm init --advertise-addr <MANAGER_IP>

The --advertise-addr flag configures the manager node as 172.31.80.181. The other nodes in the swarm must have access to the IP address of the manager. The output displays commands that can be used to attach new nodes to the swarm. Nodes will enter as managers or workers depending on the flag value.
- Now, it's time to add worker nodes. For this, we need to ssh into the machine, which we want to act as a worker node. The output of the swarm init must be executed in the worker terminal:
$ sudo docker swarm join --token SWMTKN-1-0duso4wax2oesqddvwqe6wpsvww8qeke7a322sny4flwo1k9c3-79qblrude1vrl1wl3xsvayu75 172.31.80.181:2377

This machine joins the swarm cluster as a worker node.
- Now, we can create an overlay network. In the manager machine, we need to run the below command to create a new overlay network.
$ sudo docker network create -d overlay myoverlaynetwork

Here, myoverlaynetwork is the name and -d enables Docker Daemon to run in the detached mode.
- Let’s build a webapp1 service and use the network to deploy it over the swarm cluster.
$ docker service create --name webapp1 -d --network myoverlaynetwork -p 8001:80 hshar/webapp

The -p option is used for port forwarding and we are using an existing application from DockerHub.
- Let’s create a MySQL service also directly from DockerHub.
$ docker service create --name mysql -d --network myoverlaynetwork -p 3306:3306 hshar/mysql:5.5

- To list the services, we can use the docker services ls command.

As we can see, we have 2 services, one is the webapp and the other is the MySQL database.
- Now, we need to check which container is running on the manager node and open the terminal where our webapp is running.

The docker ps command is used to list the running containers. We can see our webapp is running in a container on our manager node. Now, we need to edit the servername and password in the index.php file for our webapp. To get into the webapp container, we need to use the exec command and open the nano editor to edit the file. $ sudo docker exec -it CONTAINER_ID bash Using this command, we will have access to the containers bash. Here, we can open the index.php file to edit.
$ sudo nano /var/www/html/index.php
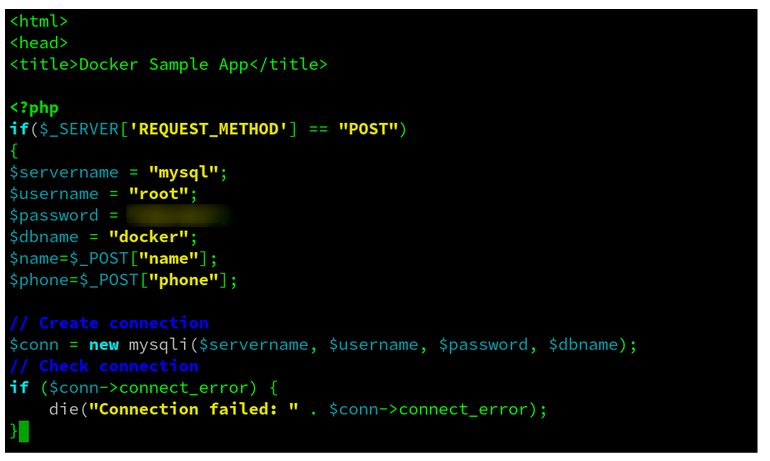
We need to change the credentials stated for our web app and db to work together. Make sure you use the same password.
Now, we SSH on to the other machine (worker node). This is where our MySQL database container is running. We need to get into the container to access the database. Execute the below command to enter the container.

$ sudo docker exec -it MYSQL_CONTAINER_ID bash

We can use docker ps to get the container ID.
Now, we are inside the MySQL container. Let us connect to the db using the below command.

$ mysql -u root -p<password>
Use the password that you updated in the manager node inside the index.php file in the webapp container. Here, -u is a flag for username and -p for password. Now, we need to create Database and a table so that we can populate data inside them. To create a database (in mysql shell), we can use -
mysql> CREATE DATABASE courses;
After creating the DB, we need to use this DB as our current Database, so, type -
mysql> USE courses;

To create a table and its definition, use the below commands in the mysql shell.
mysql> CREATE TABLE course_details (course_name VARCHAR(10), course_id VARCHAR(11));
Now, exit the shell, and let's check if our webapp can populate this Database table. In the browser, navigate to the URL
<IP_ADDRESS_OF_MANAGER>:8001/index.php
If you are using an EC2 instance, make sure that you expose the port 8001, by changing the inbound and outbound rules.
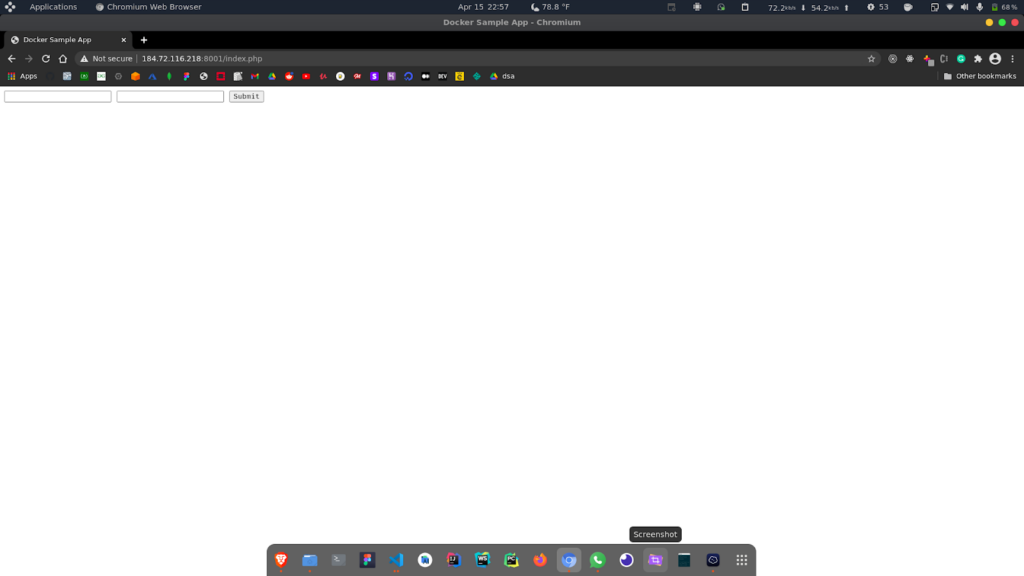
We will get this form. Here, we can enter details like course name and id and the database will be populated. Now, let us check the table in mysql. In the mysql shell in worker node, we can run the select command -
mysql> SELECT * FROM course_details;
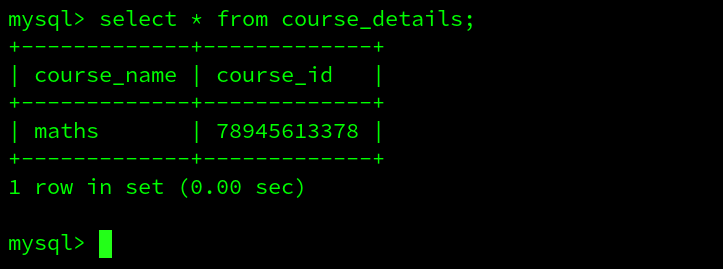
We have our database table populated, which means that our containers or nodes were successful in communicating through the network that we created.
Wrapping Up!
In this article, we discussed briefly about docker networking and the need for it. Then, we discussed the three pillars of Docker networking where we discussed the container networking model and networking drivers. Finally, we discussed some of the basic Docker networking commands using a docker swarm practical example by creating a multi-container application. We certainly hope that you will now be able to get hands-on with Docker networking and it’s commands. Happy Learning!
People are also reading:
- What is Docker Networking?
- What is Docker Swarm?
- What is Docker Compose?
- What is Docker Container Linking?
- What is Docker Logging?
- Difference between Docker Images and Container
- Docker Interview Questions
- How to Use a Dockerfile to Build Docker Images?
- How to list Docker Images?
- How to Search Docker Images using CLI?