

Developed by Apple Inc. in 2001, macOS (formerly known as Mac OS X) is a Unix operating system, a primary operating system for Apple’s computers and laptops. After Windows, macOS is the second-most popular operating system. It is a successor to the classic Mac OS (Macintosh Operating System) that has nine different releases launched between 1984 to 1999.
One of the most useful tools macOS provides is the Terminal. Every operating system comes with its own terminal . It is a text-based interface where you can enter commands and perform certain tasks, like opening a document, manipulating a file, or running a program . It primarily performs two tasks:
- Taking input from the users in the form of commands.
- Displaying the output on the screen.
Network administrators and expert technical users leverage Terminal to perform tasks or actions that the OS’s GUI applications do not support. Besides, a terminal provides a quicker and simpler way to navigate through the system.
Initially, you may find it intimidating to work with the terminal. However, once you have a grasp of Mac Terminal commands, you will have the whip hand in navigating the macOS environment.
In this article, we shall make you familiar with some commonly used Mac Terminal commands. Prior to it, for those who are new to macOS, we shall help them with opening the terminal on Mac.
How to Open the Terminal on Mac?
There are two ways to open the Terminal on Mac, as follows:
- To open the Terminal on Mac, go to ‘Finder’ → ‘Applications’ → ‘Utilities’. There you will find the Terminal and click on it to open it.
- You can press ‘command’ and the space buttons on the keyboard simultaneously to open the Spotlight Search bar. There you can type Terminal and click on the first suggestion you get.
You can use any one of the ways to go to the Terminal, and the following black screen appears:

You can also customize the appearance of your Terminal. To do so, while you are on the Terminal app, go to the top-left corner of the screen and select ‘Terminal’ → ‘Preferences.’
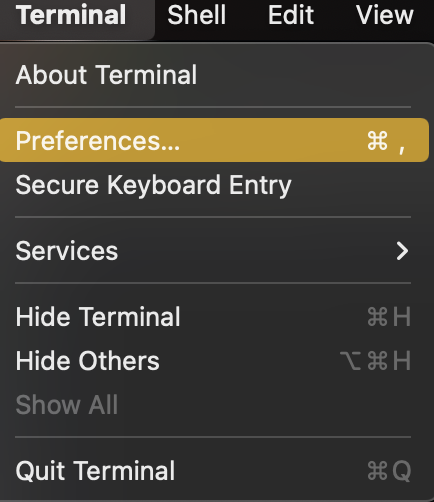
After you click ‘Preferences’, a screen appears where you need to choose the ‘Profile’ option for customizing the Terminal, as shown below:
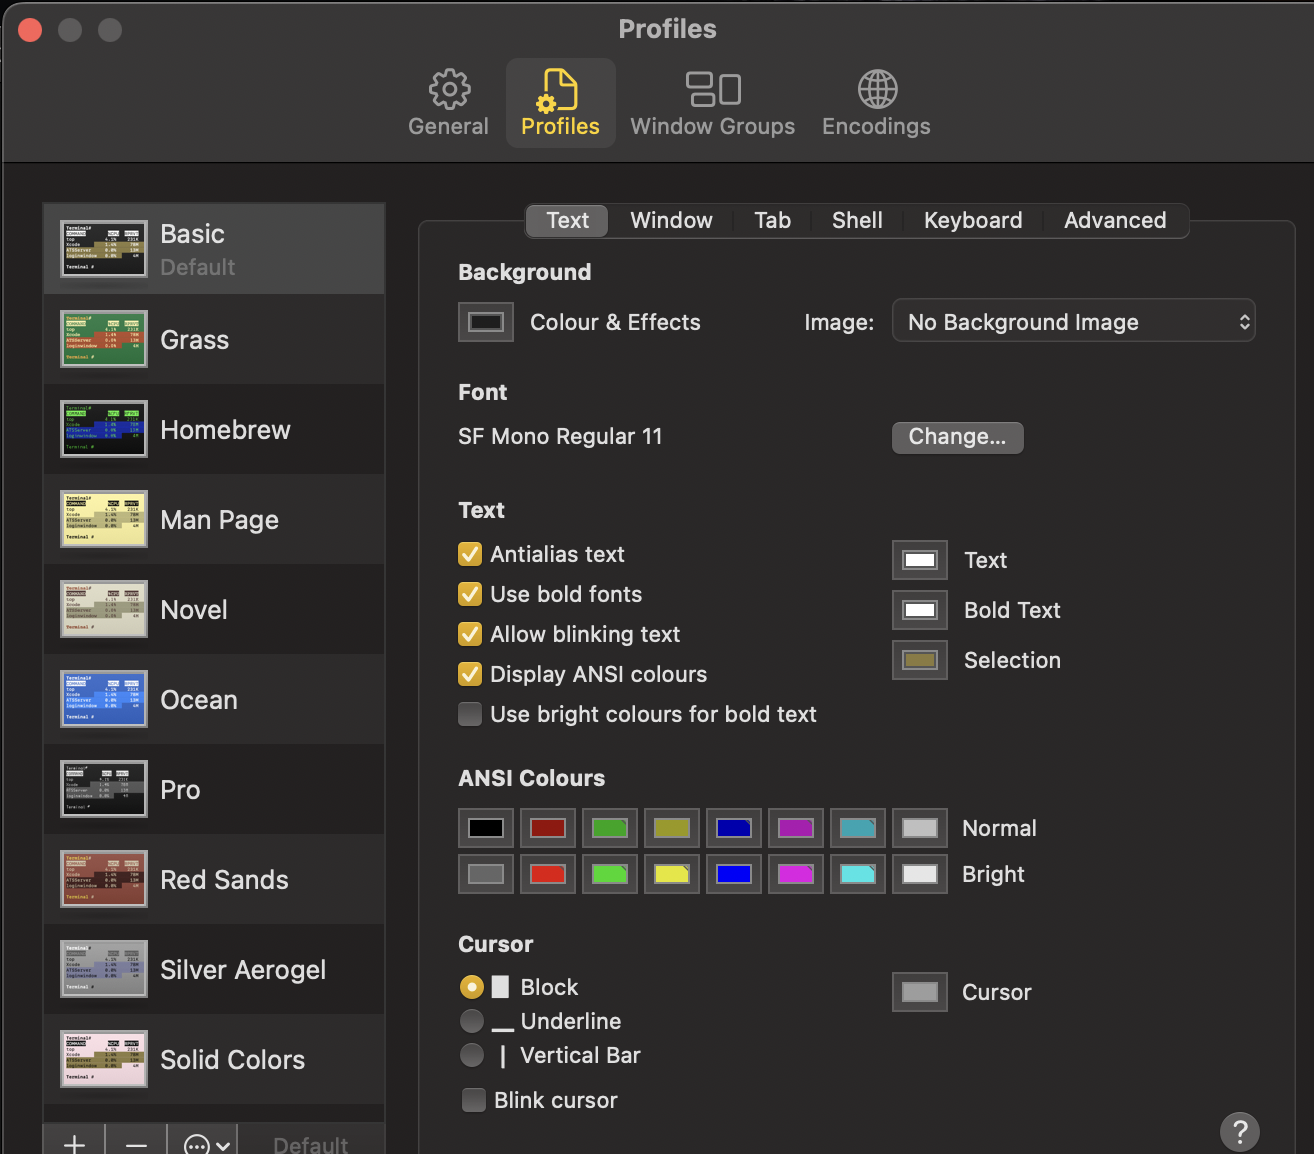
Here, you can change the background color, text color, font style and size, etc.
The List of Mac Terminal Commands
Let us now go through some common Mac Terminal commands in this section. There are a plethora of Terminal commands categorized based on the tasks you need to perform.
Basic Commands
|
man [command] |
If you are not aware of a specific command and want to find out what it is used for, you can simply use man followed by the command you want to know about and press enter; you will get the entire information. |
|
. (Single Period) |
Current directory |
|
.. (Double Period) |
Parent directory |
|
~ (Tilde) |
Home directory |
|
* |
Wildcard. It refers to anything that matches the specified criteria. For instance, ‘*.jpg’ refers to files with the extension jpg. |
|
clear |
When you enter clear on the Terminal, it clears the Terminal’s space. |
|
sudo [command] |
It is a short form of ‘super user do.’ This command lets you be a superuser and execute programs. To use this command, you need to be the admin of the system and enter the administrator password. |
|
history |
Terminal comes with the feature of storing all the commands you have entered in it. The history command lists out all the commands you used before. |
|
history -c |
It deletes all the history of command of the Terminal. |
|
man [command] |
You get the manual help of the command you specify with man . |
|
[command] -h |
To get help with the command you want to use, append -h to that command. |
|
nano [file] |
Use this command to open the Terminal editor. |
|
open [file] |
Specify the file name you want to open, and this command opens up the file where you can read and write to the file. |
List Directory Commands
The list directory commands are one of the most used collections of commands for listing the content of any folder.
|
pwd |
It is an acronym for Print Working Directory. Use it to print the path of your working directory from the root. |
|
ls |
This command lists all files and subdirectories in the current directory, except the hidden ones. |
|
ls -l |
It displays the list of all files and subdirectories in a long format, which includes the mode, owner, group name, pathname, date and time the file was modified, and many more. |
|
ls -la |
This command lists the detailed content of a directory, including the hidden files. |
|
ls -C |
It outputs all the lists and subdirectories in multiple columns. |
|
ls -a |
This command outputs all entries, even those having a single period (.) and double period (..) |
|
ls -1 |
It lists all files and subdirectories in one line per entry format. |
|
ls -F |
This command lists all entries, where it displays * (asterisk) after executable programs or scripts, / (slash) after the path of each directory, and @ after the link. |
|
ls -S |
It lists all files by sorting them as per their sizes. |
|
ls -l / |
This command lists all the file systems from the root with symbolic links. |
|
ls -lt |
It outputs all the files in the order when they were last edited (the most recently modified files first). |
|
ls -lo |
You will get the list of files with the size, owner, and flags. |
|
ls -lh |
It lists all files with human readable sizes, like MB, KB, or GB. |
Change Directory Commands
If you wish to change the directory that you are currently working in, the following list of commands will help you out.
|
cd |
This command lets you go to the Home Directory. |
|
cd [folder name] |
If you want to change your current directory to another one, this command lets you do it by specifying the name of the directory where you want to work. |
|
cd ~ |
Go to the Home Directory. |
|
cd .. |
With this command, you can move to the parent directory. |
|
cd ../.. |
This command lets you move up two levels, and you can up as many levels as you want using ‘../’. |
|
cd - |
This command lets you move to the previous directory that you browsed the last. |
File and Directory Management
Let us now look at the commands that help you create, edit, and delete directories and folders.
|
mkdir <dir> |
This command lets you create a new subdirectory with the name <dir> in the directory where you are currently working. |
|
mkdir <dir1> <dir2> <dir3> |
You can create multiple subdirectories with a single command. |
|
mkdir "<dir>" |
This command lets you create a folder having the space in its name. |
|
mkdir -p <dir>/<dir> |
It allows you to create nested folders. |
|
rmdir <dir> |
Use this command to delete a specific folder. It works only with empty folders. |
|
rm -R <dir> |
You can delete both the folder and its content with this command. |
|
touch <file> |
This command creates a new file without any extension with the name that you specify with touch . |
|
cp <file> <dir> |
It copies the specified file to the specified directory. |
|
cp <file> <newfile> |
This commands copies the specified file to the current directory with the name <newfile>. |
|
cp <file>~/<dir>/<newfile> |
It copies the specified file to the directory and renames the copied file. |
|
cp -R <dir> <"new dir"> |
You can copy a specific folder to another folder having spaces in its name. |
|
cp -i <file><dir> |
This command provides the warning overwrite message before you copy a file. |
|
cp <file1> <file2> <file3>/Users/<dir> |
Use this command to copy multiple files to a folder at once. |
|
rm <file> |
This command permanently deletes the file from your system. |
|
rm -i <file> |
This command deletes the file only after your confirmation. |
|
rm -f <file> |
It forces the file to be removed from the system without any confirmation. |
|
rm <file1> <file2> <file3> |
This command deletes multiple files without your confirmation. |
|
mv <file> <newfilename> |
It moves the file to another file or renames the file. |
|
mv <file> <dir> |
It moves the file to a directory or folder and overwrites the existing files. |
|
mv -i <file> <dir> |
This command warns you before overwriting the files present in a directory. |
|
mv *.png ~/<dir> |
It moves all the png files present in the current folder to another folder. |
|
ditto -V [folder path][new folder] |
This command copies the content from one folder to a new folder. ‘-V’ prints the status of each file copied to a new folder. |
Process Management
With process management commands, you can retrieve the total number of processes currently running on your system, determine their resource usage, and kill them. This set of commands eliminates the need for the Activity Monitor GUI application.
|
ps -ax |
It outputs all the running processes, along with their detailed information, including PID (Process ID), the process name, location, and the elapsed time running. |
|
ps -aux |
This command outputs all the processes with %cpu, %mem, page in, PID, and command. |
|
top |
Use this command to get the live information of the currently running processes. |
|
top -ocpu -s 5 |
This command outputs the processes sorted according to the CPU usage, and the list updates every 5 seconds. |
|
top -o rsize |
It displays the list of processes sorted according to their memory usage. |
|
kill PID |
Use this command to kill the process by specifying its ID. |
|
ps -ax | grep <appname> |
Use this command to find the process using its PID or name. |
Network Management
Managing and configuring the network is one of the primary tasks achieved through the Terminal. The Terminal provides the most convenient and easiest way to configure the network and collect all information related to the network. So, let us now move on to discussing the set of network management commands.
|
ipconfig |
This command checks the IP address of your system, while it has many other purposes. |
|
ping <host> |
You can determine whether you can make a connection to a host or not. Here, the host can be your device’s IP address connected to a web domain or a network. |
|
netstat |
This command displays all your incoming and outgoing network connections. |
|
whois <domain> |
You will get the whois information of the domain, which generally includes basic contact details, Name Servers, etc. |
|
curl -O <url/to/file> |
You can download the file from the internet over the HTTP, HTTPS, or FTP protocols without the browser curl. |
|
arp -a |
This command displays a list of all devices connected to your local network. It provides you with the IP and MAC addresses of those devices. |
|
ssh <username>@<host> |
If you wish to establish an SSH connection to <host> with user <username>, this command comes in handy. |
|
traceroute [hostname] |
This command determines the path and hops the packets traverse from your device to the destination address. It serves as a troubleshooting tool because it lets you identify the exact location where the packets do not traverse. |
|
scp <file><user>@<host>:/remote/path |
This command copies <file> to the remote <host>. |
Search Commands
The Mac Terminal makes it easy for you to search anything on the system using the following commands:
|
find <dir> -name <"file"> |
This command lists all the files with the name <” file”> in the <dir>. You can add Wildcards (*) for searching the parts of filenames. |
|
grep "<text>" <file> |
You can find all the occurrences of <text> within the <file>. Also, you can specify -i for case insensitivity. |
|
grep -rl "<text>" <dir> |
This command provides you with all the occurrences of <text> in <dir>. |
Permissions
Terminal lets you manage the permissions of files and folders present on your Mac system. With certain commands, you can manage the permissions of files and folders to avoid unauthorized access. Before we move to the commands, let us first understand the octal permission notation.
|
No Permission |
0 |
- - - |
|
Execute |
1 |
- -x |
|
Write |
2 |
-w- |
|
Write & Execute |
3 |
-wx |
|
Read |
4 |
r- - |
|
Read and Execute |
5 |
r-x |
|
Read and Write |
6 |
rw- |
|
Read, Write, and Execute |
7 |
rwx |
Commands
The following commands lets you set the octal permission notation for files and directories on your Mac system:
|
ls -ld |
This command displays the default permission for the Home directory. |
|
ls -ld/<dir> |
You can view the read, write, and access permission of a specific directory. |
|
chmod 755 <file> |
This command changes the permission of <file> to 755. |
|
chmod -R 600 <dir> |
It lets you change the permission of a folder, along with its content, to 600. |
|
chown <user> <file> |
You can change the owner of the file using this command. |
|
chown <user>:<group> <file> |
It changes both the ownership and group of a file. You can add -R to include the file’s content. |
Some Other Commands
Command History
|
Ctrl + R |
You can check the list of commands you've used before. |
|
history n |
This command displays the list of all commands that you have typed earlier. You can provide a number to limit the number of entries to be displayed. |
|
!! |
It executes the last command that you have typed on the Terminal. |
|
![value] |
This command executes the last typed command that starts with a value. |
Output
|
cat <file> |
This command outputs the content of <file>. |
|
less <file> |
It also outputs the content of <file>, but the command supports pagination and more. |
|
head <file> |
This command displays the first 10 lines of the specified file. |
|
<cmd> > > <file> |
This command appends the output of cmd to <file>. |
|
<cmd> > <file> |
It sends the output of cmd to the specified file. |
|
<cmd1> | <cmd2> |
This command directs the output of <cmd1> to <cmd2>. |
Environment Variables and Path
|
$echo |
This command directs Terminal to print something and display it to you. |
|
echo $PATH |
It lets you check the value of the path variable that stores the list of directories with executable files. |
|
printenv |
This command outputs a list of the environment variables that are currently set. It also provides shell information. |
|
echo $PATH >path.txt |
This command exports the path directory to a text file. |
|
export PATH=$PATH:absolute/path to/program/ |
You can execute a program through Terminal only in your current session. |
Conclusion
This was a comprehensive list of commands that the Mac Terminal supports to help you navigate the system quickly with ease. There are many more commands, but we have mentioned the most commonly used ones. Though you don’t learn all the aforementioned commands, make sure to master those that make your workflow smooth and seamless and save most of your time.
Learn and master these commands and use the Mac Terminal like a Pro.
People are also reading: