

In this tutorial, we will discuss the OpenCV library and some of the most important and basic image transformations using OpenCV in Python. The OpenCV library is one of the most popular Python computer vision libraries that is generally used to drive information and insights from media files such as videos and images. OpenCV is primarily used to train deep learning and machine learning models for projects involving image and video recognition. In programming, an image file can be represented through a three-layer matrix, where every layer defines the RGB color code for every pixel. Similarly, when it comes to images, OpenCV also reads the image file as the layers of the matrix, and for the matrix, it uses the Python numpy library. Image transformation is the basic operation that we can perform on the image matrix that results in changing coordinates or matrix values for an image, and with the help of the Python OpenCV library, we can perform various image transformation techniques on images, namely image scaling, image translation, image rotation, and image cropping.
Installing the OpenCV Library
OpenCV is an open-source Python third-party library. Therefore, you can simply install it using the following pip command:
pip install opencv-python
opencv-python
is the main OpenCV module, but there is also another useful module by the name
opencv-contrib-python
. This module is similar to the
opncv-python
module, but it contains some extra features. You can also install this OpenCV module with the following pip install command:
pip install opencv-contrib-python
Nonetheless, we suggest you install the original module because it is used in production and supported by many platforms. For all the examples we have provided here, we are using the following image, tesla.jpg, whose dimensions are 1600x740. It is very important to know the actual dimensions of your image when you deal with different image transformations. You can find the height and width of your image with
height =image.shape[0]
,
width = image.shape[1]
.
Original Image (tesla.jpg)

Image Transformations Using OpenCV in Python
1) Image Scaling with OpenCV in Python
In image scaling, we resize the image with the help of the OpenCV
resize()
method. Scaling is generally used when we want to optimize image processing because some images can be of large dimensions and take a lot of time to process in further operations. With the help of scaling or resizing, we can reduce the dimensions of the image and make the image processing faster. The
resize()
method can help in
image scaling
and modify the image's height and width up to particular specified dimensions. Now, let's code for down-scaling our
tesla.jpg
image with the OpenCV
resize()
method.
import cv2 as cv

#read image; tesla.jpg and python script are in the same directory
image = cv.imread("tesla.jpg")

original_height = image.shape[0]
original_width = image.shape[1]

#show original image
cv.imshow(f"Original image {original_width}X{original_height}", image)

#dimensions for new scaled image w=500, h=500
resize_dimensions = (500, 500)
resize_img = cv.resize(image, resize_dimensions, interpolation = cv.INTER_AREA)

#show resized image
cv.imshow(f"Resized Image {resize_dimensions[0]}X{resize_dimensions[1]}", resize_img)


#wait for infinite time to press a key
cv.waitKey(0)
Output
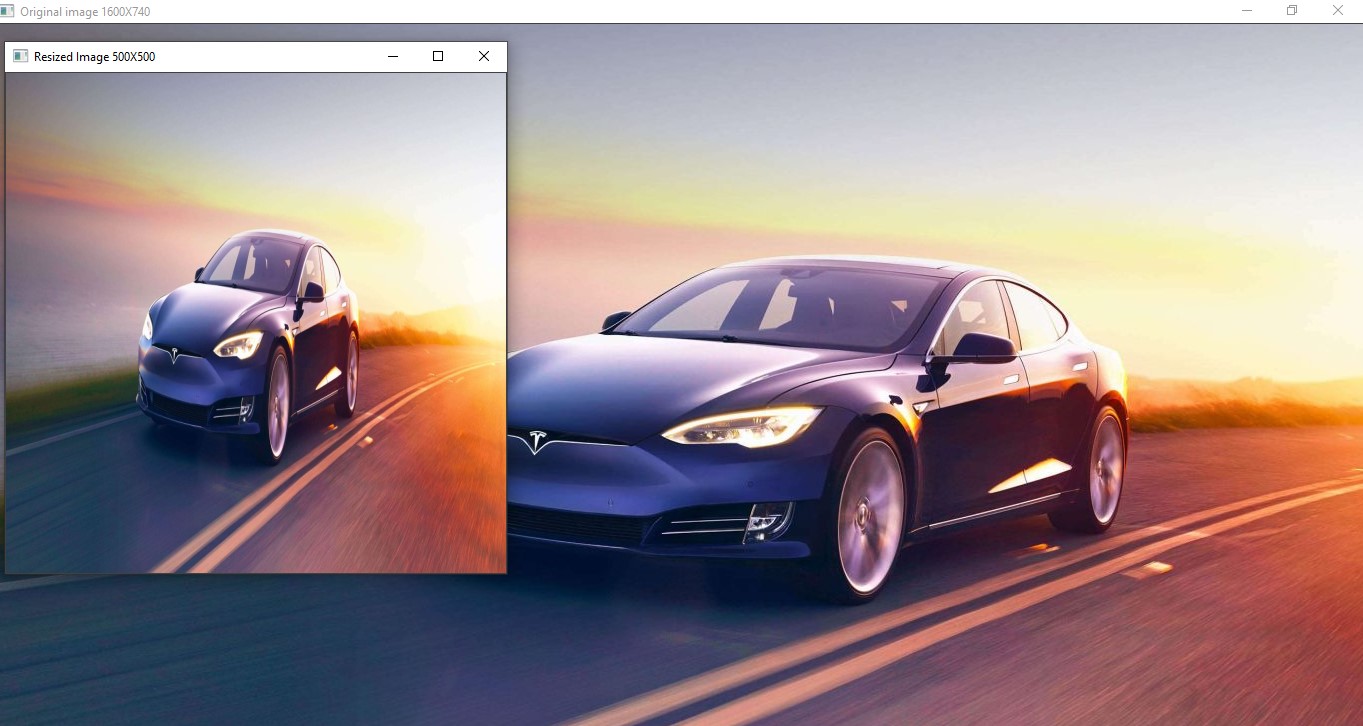 As you can see, we reduced the size of the original image. The output shows both the images, the original, as well as the scaled or resized one. Also, on the window title, you can see their dimensions.
2) Image Translation with OpenCV in Python
In image translation, we shift the image to the X or Y direction from its original location. So with image translation, we basically shift the image left, right, down, or up, or a combination of these. The image translation in OpenCV is performed by using the
warpAffine()
method. It accepts the original image, translation matrix, and the dimensions for the translation matrix. The translation matrix,
transMatx
, is a 2d numpy matrix
[[1,0,x], [0,1,y]]
, where x and y are shifting coordination for the translation.
- If x is negative -x -----> left shifting
- If y is negative - y ------> Up-shifting
- When x is positive x --------> Right Shifting
- When y is positive y ---------> Down
Now, let's code for performing a down-right shift on the
tesla.jpg
image using the OpenCV
warpAffin()
method.
import cv2 as cv
import numpy as np

#read image tesla.jpg
image = cv.imread("tesla.jpg")

height = image.shape[0]
width = image.shape[1]

#show original image
cv.imshow(f"Original image {width}X{height}", image)


#translate function
def translate_img(image, x, y):
    #translation matrix
    transMatx = np.float32([[1,0,x], [0,1,y]])
    dimensions = (width, height)
    return cv.warpAffine(image, transMatx, dimensions)

translated_image = translate_img(image, 200, 200)
#show translated image
cv.imshow(f"Translated image {width}X{height}", translated_image)

#wait for infinite time to press a key
cv.waitKey(0)
Output
![]()
3) Image Rotation with OpenCV in Python
As the name suggests, in image rotation, we rotate the original image at a specified angle. Generally, we rotate the image from the center, but we can also specify the specific points around which we want to rotate the image. If we specify the rotation angle to a positive value, then the image will rotate anti-clockwise. If the angle is negative, the image will rotate clockwise. Now, let's code to rotate the
tesla.jpg
image with 70 degrees using the OpenCV
warpAffine()
method.
import cv2 as cv
import numpy as np

#read image tesla.jpg
image = cv.imread("tesla.jpg")

height = image.shape[0]
width = image.shape[1]

#show original image
cv.imshow(f"Original image {width}X{height}", image)


#rotation function
def rotate_img(image, angle, rotating_points=None):
    if rotating_points is None:
        #rotate from center
        rotating_points = (width//2, height//2)

    dimensions =(width,height)
    rotateMatx = cv.getRotationMatrix2D(rotating_points, angle, 1.0)  #1.0 is scaling size
    return cv.warpAffine(image, rotateMatx,dimensions)

#rotate image
rotated_image = rotate_img(image, 70)  #rotate image by 70 degree

#show rotated image
cv.imshow(f"Rotated image {width}X{height}", rotated_image)


#wait for infinite time to press a key
cv.waitKey(0)
Output

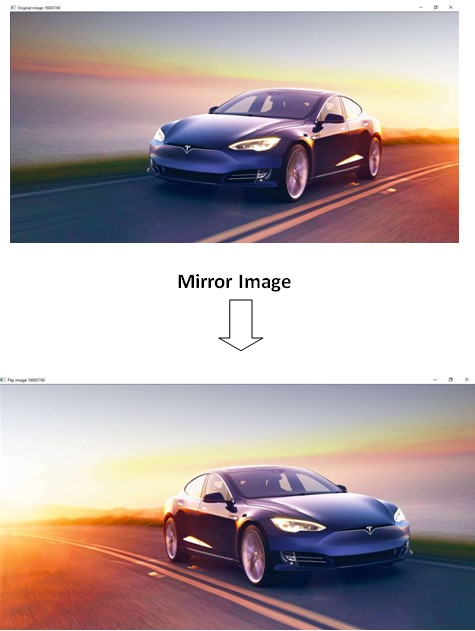
Mirror Rotation with OpenCV in Python
OpenCV provides the
flip()
method that can flip an image vertically and horizontally. By flipping the image horizontally, we can show a mirror image. The flip() method accepts the image and an integer value
0
for the vertical flip,
1
for the horizontal flip, or
-1
for vertical and horizontal flip. Next, let's code to flip our
tesla.jpg
image horizontally with the OpenCV
flip()
method.
import cv2 as cv

#read image tesla.jpg
image = cv.imread("tesla.jpg")

height = image.shape[0]
width = image.shape[1]

#show original image
cv.imshow(f"Original image {width}X{height}", image)

flip_image = cv.flip(image, 1)  #0 for vertical 1 for horizontal

#show flip image
cv.imshow(f"Flip image {width}X{height}", flip_image)

#wait for infinite time to press a key
cv.waitKey(0)
Output
4) Image Cropping with OpenCV in Python
In image cropping, we crop a specific section of the image. The OpenCV library reads the image in the matrix, which is an array of arrays. With the help of array or list slicing, we can slice or crop a specific part of an image. Now, let's code to crop a section from the image.
import cv2 as cv

#read image tesla.jpg
image = cv.imread("tesla.jpg")

height = image.shape[0]
width = image.shape[1]

#show original image
cv.imshow(f"Original image {width}X{height}", image)

#crop image
cropped_img = image[300:700, 200:700,]
#show cropped image
cv.imshow(f"Cropped image {cropped_img.shape[1]}X{cropped_img.shape[0]}", cropped_img)

#wait for infinite time to press a key
cv.waitKey(0)
Output

Conclusion
In this tutorial, we learned about image transformations using OpenCV in Python. Here, you learned about different OpenCV methods to scale, rotate, translate, reflect, and crop images. Apart from images, the Python OpenCV library is capable of manipulating or modifying videos. People are also reading:


Leave a Comment on this Post