
As we know that there are millions of applications on the internet, and they are available for everything and different applications perform amazingly to help users in their work. The basic rule of marketing a product says that it is essential to go for the place where you can get customers. However, it requires a high amount of money as well as efforts to bring a customer for your product. Apart from it, you need to improve user experience and find the requirement of the audience as per their devices such as mobile. Hence you have to build a fantastic app for targeting a mobile audience. This tutorial will help you to know that how to make an app.
How to make an App?
Indeed, app creation is not a simple task. It takes difficulties, and it involves a high investment so let's discuss the app creation process in brief.
1. Define the objectives of your mobile application
As you know that every significant initiative requires an idea, so your application requires a fantastic idea for the best outcome possible. Firstly, you have to note down all of the requirements and ideas which can be implemented in the application. You have to create complete lists of aspects that must be added to the app and aspects that you want to add to the app. It can help you to differentiate between required features and desired features. While making an app, you have to make sure that your app should be strong and expressive, and it is known as Minimum Viable Product (MVP). This can result in the simplest version of your application, so you have to focus on the essential aspects for boosting your app development process. Your application must satisfy the below goals:
- Ideal goals for user
- The business goal of your app
You have to understand your audience and note down the aspects for them. You need to include various questions in your list, such as:
2. What zones of our business need improvement?
Our middle has strong brand mindfulness, and we increase new customers reliably. However, we have a better than expected agitate rate. A portion of our agitated clients noticed trouble booking their classes and fitness coaches as one of the key motivations to leave, as it was just accessible on the work area and a large number of our customers are regularly in a hurry. Simultaneously, we invest loads of energy to run the coordination and fundamental correspondence with our customers, which expends the vast majority of our group assets and endeavors, making us wasteful and constraining our development.
3. By what means can a mobile application sway these issues?
With a mobile application, we could robotize numerous procedures, for example, review, booking from mobile and significant service updates while empowering simple client criticism and coordinated talk.
4. What is the likely outcome?
On the client-side, we could expand in general customer fulfillment and lift extraordinary social evidence. What's more, as a business advantage, we could see expanded efficiency and more significant income. Your responses to this progression will be your center direction all through the remainder of this procedure.
5. Research about your competitors
Now you have understood the requirements of your application, so it is time to learn about your competitors. It helps you to understand those who are offering similar services to you. It would be best if you focused on local competitions as well as broad competitors around the country and world. It is beneficial for you to have new ideas, and you fulfill the market's gaps through it. Discovering bits of knowledge likewise fills another need. It would help if you strolled in the shoes of your clients, as it were. Rather than surveying requirements and wants while sitting securely before your PC, you need to get out there and converse with individuals. You have to ask the following questions:
- Who is your app for?
- What are they like?
- How does your app affect specific issues that users are struggling with?
- How are they solving those issues?
6. You can create Mockups of the app
It is suitable for you to create mockups before you begin to develop the app. Mockup stands for a rough sketch of the app’s layout, workflow, and user interfaces (UIs). For Example:
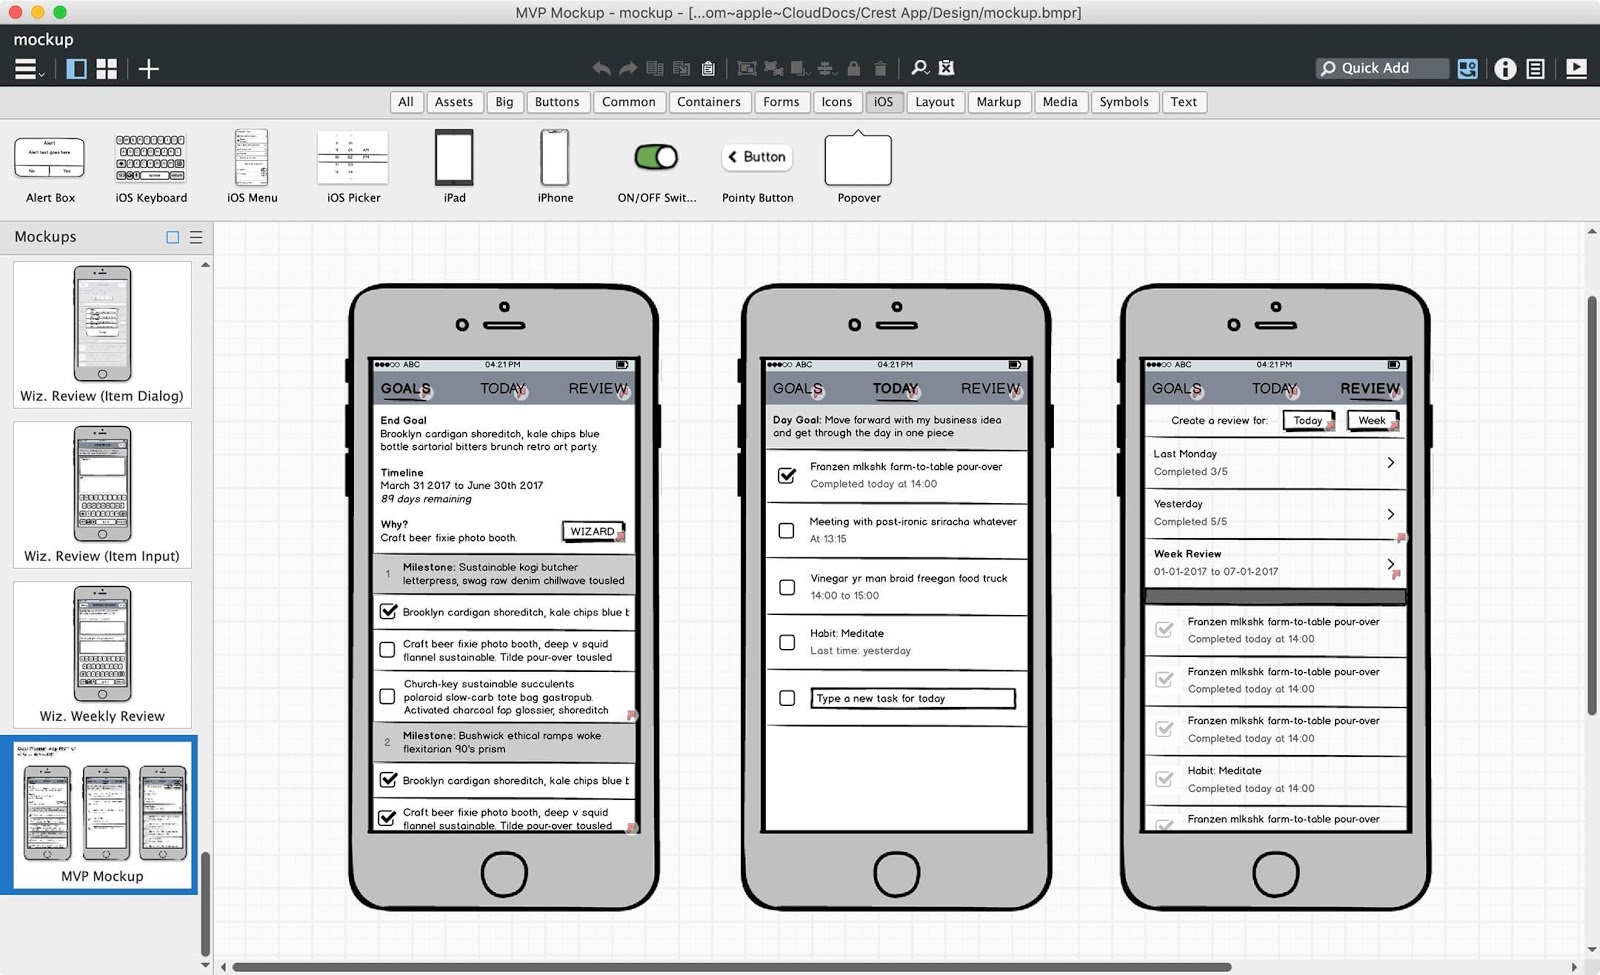 In this image, you can see that we have created three essential UIs of the application and the name of this software is Balsamiq Mockups. Apart from it, a Mockup doesn’t include:
- Perfect UI components
- Correct positioning of UI components
- Multiple colour designs and effects
A mockup describes the UI of your app without confusing you with additional details. It’s a functional rather than an artistic approach to the design of your app. Balsamiq mockup consists of various features like you can navigate different screens by clicking on a particular icon which is defined for the specific screen. The software has a high number of UI templates, and they have the right balance between flexibility and roughness. You can provide information to your client to guide them by the UI through mockups and support them seeing and imagining the entire app.
7. Create a graphic design of the app
You had an idea, and now it is taking shape as reality, so you have to create a graphic design of the app. Make sure that your app must include graphic effects, pixel-perfect visual details, image assets, and animations or motion design (if you want to add them). We suggest two methods for creating the graphics of your app:
- DIY with the graphics template
- You can hire a graphic designer
A graphic designer spends years to become and improve their skills, and a great graphic designer can offer 100x more excellent results than an amateur designer. As an app developer, you have to work with your strengths, and it means you have to outsource work in which you’re not especially good at. You need to take benefit of platforms such as Upwork or Toptal for hiring an expert graphic designer. In case you want to do it alone, then you can use a designed template, especially for iOS apps. You can use the building blocks of templates for creating your design. There are several templates:
- iOS iPhone GUI from Facebook
- NOW, TETHR and DO by InVision
- Stitch by Lina Seleznyova
- Stark UI kit by Baianat
- Apply Pixels by Michael Flarup
- Phoenix by Adrian Chiran
Particularly the iOS kit from Facebook is useful because it involves pixel-perfect UI elements of the iOS itself. Apart from it, you can utilize it for creating detailed mockups with a default iOS UI. You must have to be aware of copyright or licensing when utilising other’s real work. You can use various tools such as Sketch, Affinity Designer and Photoshop for creating an amazing graphic design.
8. Create the Landing Page of your application
App developers mostly look for application marketing, just because they made a great app, then it does not mean that the audience will find it easily. Therefore you have to create the landing page for the app, and usually, it has to be created before building the app. As we understand that an app developer wants to build a connection between customers and them for improving the conversation. This type of communication can result in customer requirements of your app, and most users can become your customer through it. The landing page must have the below components:
- An appropriate headline at the top of the landing page.
- A complete introduction or explanatory video
- Screenshots of the application or Mockups
- Features and benefits of your application
- ‘About us’ section
It is helpful for you to gain customers because it can generate interest in the audience. A simple page of the website requires a long way to create a fantastic connection with the desired audience. It is intelligent to ask for their email address so that you can keep in touch with them. There are various tools for creating web pages such as Strikingly, WordPress and Leadpages and all of these tools do not require any knowledge of HTML.
9. Create the Application through Xcode and Swift
Now you have everything for your application, so it is time to create the application. You have created various mockups, so you can create the apps through Swift and Xcode. The Xcode IDE involves a code editor, debugging tools, project manager, built-in documentation, and Interface Builder. Swift is an automatic and robust programming language, and it is the default programming language for creating iOS, macOS, iPadOS, tvOS, and watchOS apps. In case you are learning iOS development, and we recommend you learn Swift rather than Objective-C. There are two types of application development:
- Front-end: It is the section of the application you can see, and its navigation, user interaction, involves layout, graphics, data processing, and animation.
- Back-end: It is the section of the application you can’t see, and it involves networking, user management, and data storage and databases.
When you create the front-end of the application, you should set up the navigation of the app, and build the features of the application. The back-end of your app frequently stores data, and many apps use cloud-based back-ends such as Firebase or Parse Server. If data is generated in the app like tweets, social media posts, or photos. This data is uploaded to a cloud and then stored in a database. The app holds local copies of the data and updates them when the new data comes into storage. As the developer and you combine front-end and back-end, so assume you are creating a Twitter app. You create (UI) user interfaces for building and see tweets, and you connect these UIs to the back-end database. Newly generated tweets are stored in the database, and earlier saved tweets can be viewed from the database. A significant amount of tools can improve the app development process, so you don’t need to code for everything. Here is a smart pick of my favorite tools to build iOS apps: Sketch and Balsamiq Mockups for graphic design and UI/UX
- Interface Builder, Xcode, Swift, and SwiftUI for iOS development
- Firebase, Realm, Core Data, and Parse Platform
- For storage and databases
- Libraries and CocoaPods like Alamofire, SwiftyJSON, and MBProgressHUD
- PaintCode molds your visually designed UI elements in the working Swift code
- Fastlane automates the app publishing workflow (among other things)
- The Apple Developer Documentation has beneficial articles, tutorials, and documentation on every iOS component.
- Test Flight is the default platform to beta test your app, and with it, you can share your app for more than 10.000 devices.
- Test Flight is the default platform to beta test your app, and with it, you can share your app with up to 10.000 devices
10. Launch App in the App Store:
It is time to launch your app on various platforms, and the method of publishing the app is simple. Here is the process:
- Register the developer account
- Provide title and metadata of the app
- Upload the latest app build to the App Store/ play store with Xcode
- The platform (Apple, Google) will review your app
- The app will publish after the successful approval
- Now anyone can download and install your app
- After downloading the app, users can review your app as per their experiences. Apart from it, you can promote your app through various ways such as:
- You can start a blog or use content marketing for the promotion among the audience.
- You can submit the app to a curated platform, such as Product Hunt.
- You can build connections through local publicity and influencers.
- Design an onboarding campaign for app users
- You can optimize the keywords of the app
11. Improve the app through user feedback
User’s feedback is essential for creating an app, so use the user experience, and feedback, for improving your app. here is the way to get all of the feedback:
- Use application analytics for gathering the data
- Use reviews and interviews to obtain the data
- Talk to the users frequently and build a special connection
You can use application reviews, and it is the easiest way to improve your application as per the demands of the users.
Conclusion
In this article, we have provided complete information about creating the application because it consists of different steps. It is essential to follow all of the steps for the best results possible. It can offer you a lot of benefits, so make sure that you create the best application for your audience.
People are also reading:
- iPhone Data Recovery
- Best iOS Emulator
- How to find Wifi Password on Windows 10?
- Best Android Books
- Best Android Lock Screen Removal for Your Smartphone
- Best Software for Android Data Recovery
- Appium Installation Process
- Android Architecture
- Android Interview Questions & Answers
- 8 Best Android Emulators for Windows and macOS